
This is the most closely guarded of all the secrets of restaurant cooking.
Once prepared, it has a very smooth texture and a pale golden color. Taste it and it is pleasant with a subtle curry flavor. Every good restaurant has a large pan of the sauce always at hand, with the recipe varying only slightly from chef to chef. It forms the base of all the restaurant curries from the very mild to very hot and spicy. It will keep in the refrigerator for up to 5 days, although the best restaurants will prepare no more than 3 day' requirement in one go. Together with your spices, the prior preparation of the curry sauce and whatever vegetable you propose to use, a selection of dishes can be made in a matter of minutes.
You will see that the making of the curry sauce is in fact simple with no special equipment required other than a blender. It is essential, though, that you follow strictly the instructions for blending and skimming as these are two procedures that can make the difference between a good curry and a poor one.
The quantities given here are enough for 3 to 4 people. If you do not require so much, you may halve the quantity of each ingredient, or alternatively freeze the remainder of the finished sauce.
Adapted from "The Curry Secret" from Kris Dhillon
For approximately 4 main course dishes.
Preparation and cooking time : About 1 1/2 hours
Ingrdeints:
450 g onions
25 g ginger
25 g garlic
750 ml water
3/4th teaspoon salt
1 small tin(110 g )tomatoes OR can use 2 fresh ripe tomatoes
4 tablespoons vegetable oil
1/2 teaspoon turmeric
1/2 teaspoon paprika (can substitute chilli powder)
Peel and rinse the onions. ginger, and garlic. Slice the onions and roughly chop the ginger and garlic.
Put the chopped ginger and garlic into a small blender with about 1/2 cup of water and blend until smooth.
Take a large saucepan and put into it the onions, the blended garlic and ginger, and the remainder of the water. Add the salt and bring to a boil. Turn down the heat to very low and simmer, with the lid on, for 40 to 45 minutes. You'll see that the water turns green. Don't worry.
Leave to cool.
Once cooled pour half of the boiled onion mixture into a blender and blend until smooth. Absolute smoothness is essential. To be certain, blend for at least 2 minutes. Pour the blended onion mixture into a clean pan or bowl and repeat with the other half of the boiled onions.[ To make this more easier, just drain the boiled onions and reserve the water. Simply blend the onions until smooth and combine it with the reserved water.]
Open the can of tomatoes. Pour into the rinsed blender jug, and blend. If using fresh tomatoes, blanch them first by boiling whole tomatoes in a pan of hot water for few minutes and take the skin off, let cool and then blend. Again, it is important that they are perfectly smooth, so blend for about 2 minutes.
Into a clean saucepan, put the oil, turmeric, and paprika/chilli powder. Add the blended tomatoes and bring to a boil. Turn down the heat and cook, stirring occasionally, for 10 minutes.
Now add the onion mixture to the saucepan and bring to a boil again. Turn down the heat enough to keep the sauce at a simmer.
You will notice at this stage that a froth rises to the surface of the sauce. This needs to be skimmed off. Keep simmering and skimming for 20 -25 minutes, stirring now and again to prevent the surface sticking to the bottom of the saucepan.
Use immediately or cool and refrigerate for up to 4 days.
Friday, February 12, 2010
Basic Curry Sauce
Sunday, January 24, 2010
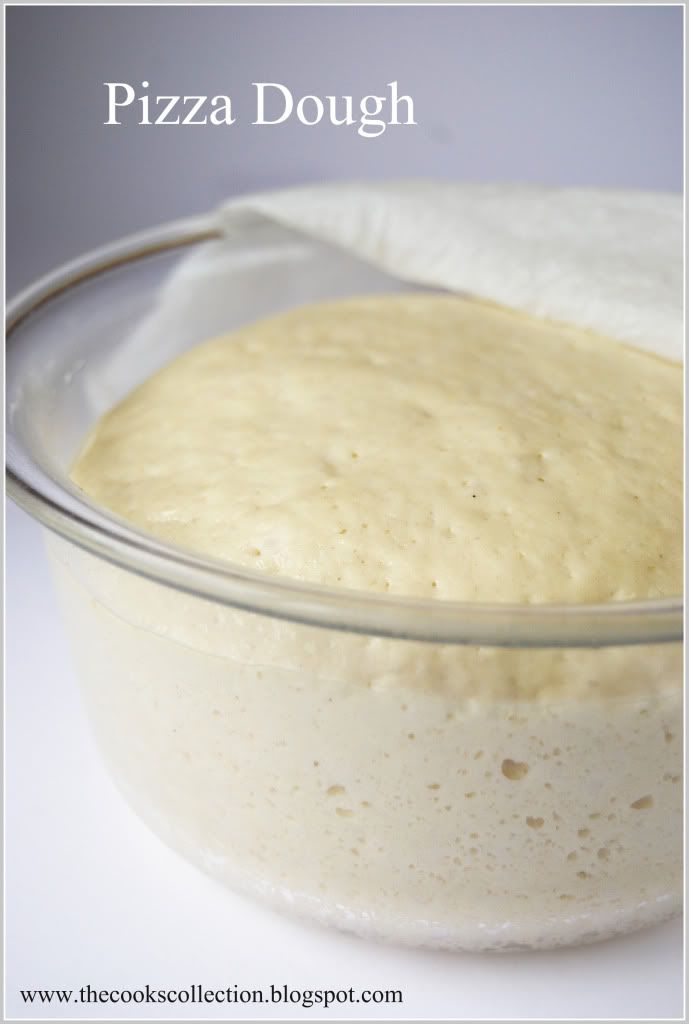
Basic pizza dough
This simple bread dough makes the perfect crust for pizzas, and this recipe is sufficient for 2 medium-sized pizzas.
Makes dough for 2 x 30 cm (12 inch) thin pizza bases or 1 (11 inch) thick pizza base
Ingredients
2 cups, 250 g (8oz) White bread flour or all purpose flour
1 teaspoon fast-acting yeast
1 teaspoon salt
1/2 teaspoon sugar
150 ml (1/4 pint) warm water
1 tablespoon extra virgin olive oil
Method
Sift the flour into the bowl of a food mixer and stir in the yeast, salt and sugar. Add the water and oil, set the mixer to low and work the ingredients until they just come together. Increase the speed and knead the dough for 8 - 10 minutes until smooth and elastic.
Shape the dough into a ball and put in a lightly oiled bowl. Cover with cling form and leave to rise in a warm place for 1 hour until the dough has doubled in size. Transfer the risen dough to a lightly floured surface and knock out the air. Use as required.
Note: To make the dough by hand sift the flour and salt into a bowl. Add the sugar then make a well in the center and add the frothed yeast, water and oil. Using your hands, gradually work the ingredients together to form a soft dough. Turn out the dough on to a lightly floured surface and knead for 8 - 10 minutes until it is smooth and elastic. Continue as above.
Sunday, September 27, 2009
Pastry Cream
Pastry cream is also known as Crème Pâtissière, pastry cream is a thickened custard used to fill sweet pastry cases and choux buns.
Source: Fresh Baked
Ingredients:
300ml milk
1 vanilla pod, split
3 egg yolks
50 gm caster sugar
2 tbsps cornflour
2 tbsps plain flour
15 gm unsalted butter
Method:
Put the milk in a saucepan and scrap in the seeds from the vanilla pod. Bring the milk slowly to the boil and remove from the heat.
In a bowl, whisk together the egg yolks, and sugar and then whisk in the cornflour and flour until the mixture is smooth.
Whisk in the hot milk and then return the mixture to the pan. Heat gently, stirring constantly until the mixture just starts to boil. Simmer for 1 minute, remove from the heat and whisk in the butter. Cover the surface with clingfilm and set aside to cool completely. Use as required.
Note:
It is really important to stir the mixture constantly as it cooks so that it thickens but doesn't become lumpy. If this does happen, put the pastry cream in a food processor and process until it is smooth. Always cover the surface of the cream with clingfilm as it cools to prevent a skin forming.
Tuesday, February 10, 2009
Chinese Rice
To the Chinese, rice is a symbol of life. When you are a dinner guest, it is considered bad manners not to consume every grain of rice in your bowl.
The Chinese generally use long grained rice for various rice preparations. You need to be very careful with the way the rice is cooked because that is what determines the end product..
The Chinese also use another variety of rice called sticky rice which has a very high starch content. This rice is not boiled in water, like the ordinary rice but has to be steamed to get the perfect texture. This symbol represents the Chinese/Japanese character for a rice grain. Clockwise from the top English, French, Hindi, Spanish/Portuguese, Tagalog and Greek.
The Chinese have developed the simple technique of rice making into an art. Each grain of the cooked rice is seperate and it is this method of cooking the rice that yields the perfect fried rice.
Preparation time; 5 minutes
Cooking time; 15 minutes
Makes 4 Cups
To prepare rice, you'll need.
1 cup Basmati rice or any other white rice
2 Tbsp oil
1 tsp Salt
Directions:

First wash the rice thoroughly and soak in 3 cups of water for 30 minutes. Drain and keep aside.
Boil 6 to 8 cups of water, add salt and a tbsp of oil.
Add the rice to the boiling water. Cook till the rice is 85% cooked.
Pour into a colander and let the water drain out. Pour some cold water on the rice to arrest further cooking.
Let all the water from the rice drain out ensuring that the rice does not contain any moisture.
Add the remaining 1 tbsp of oil and toss the rice in it.
Spread the cooked rice on a flat surface till it is cool.
Use as required
Tuesday, December 9, 2008
Few basic recipes..
These are few basic recipes that could come in handy anytime in kitchen..
GHEE( Clarified butter)
Ingredients
1. 500 gm Unsalted butter
2. 1/2 tsp fenugreek seeds(methi)
Method
1. Melt the butter in a sauce pan on a very low flame. Bring it boil.
2. Stir occasionally. Cook till a solid residue separates from the formed ghee approximately 30 minutes.
3. You can see the butter changing its colour to yellow. At this point add few fenugreek seeds.
4. Take the pan off the heat and let it cool.
5. Strain it into a glass jar using a strainer or a muslin cloth.
6. Store it in clean dry jar. There is no need to refrigerate.
-------------------------------------------------------------------------------------
WHIPPED CREAM
Makes 4 cups
Ingredients
400 gm cream
4 to 5 tbsp powdered sugar
1/4 tsp vanilla essence
Method
1. Chill the cream for at least 2 hours as the cream has to be very cold for whipping
2. Put it into a bowl and beat it with an electric beater or a whisk until it doubles in volume and forms soft peaks. Do not over beat as it can
separate the butter from the cream.
3. Carefully fold in the sugar and vanilla essence.
4. Serve with any dessert or use as a garnish.
-------------------------------------------------------------------------------------
SOUR CREAM
As sour cream is not available in India, this recipe
is suggested as a substitute.
Ingredients
200 gm fresh cream
1 to 2 tbsp thick curds
2 pinches salt
Method
1. Beat the cream until thick.
2. Add the curds and salt and mix well.
-------------------------------------------------------------------------------------
CARAMEL SAUCE
Ingredients
Sugar - 1 cup
Butter 6 Tbsp
Heavy whipping cream - 1/2 cup
Method
1. Take a heavy ,thick bottomed saucepan. Heat sugar on high till it melts completely and starts getting brown. Dont let it burn. immediately add the butter to the pan. Whisk until the butter has melted.
2. Once the butter has melted, take the pan off the heat. Count to three, then slowly add the cream to the pan and continue to whisk to incorporate.
3.Whisk until caramel sauce is smooth. Let cool in the pan for a couple minutes, then pour into a glass jar and let sit to cool to room temperature.You can store in the refrigerator for up to 2 weeks.
-------------------------------------------------------------------------------------
RICE
Ingredients
1. 1 cup Rice
2. 2 1/2 cup Water
Pot method
1.Put the rice and water into the saucepan and bring it to a boil on a high heat.
2.When small bubbles are seen on top, reduce the heat to medium.
3.When most(not all) of the water is evoporated and when rice is seen on top, switch off the heat and cover the pan with a lid and leave it for 15 minutes.
4.Rice is done.
Microwave method
1. Mix the water and rice in a microwave safe bowl and keep it on high power for 15 minutes.
2. Rice will be done.
-------------------------------------------------------------------------------------
HOW TO BAKE A POTATO(IN MICROWAVE)
1. First, wash the potato under running water . Then pat it dry with a paper towel.
2. Make four holes in the potato, with the tip of a sharp knife or a fork. This is important, as it allows the steam to escape. Otherwise the potato may explode when you cook it.
3. Then place the potato on a microwave-safe dish.
4. One big potato takes about 7 minutes to cook. 2 will take about 11 minutes. You need to just let it sit for a couple of minutes, for it to actually finish cooking.
-------------------------------------------------------------------------------------
GINGER AND GARLIC PASTE
Ingredients
100 gms. garlic ,peeled
100 gms. ginger, peeled
1 tsp. salt
1 tbsp. oil
Method; Heat oil, add Garlic and Ginger, cover and shut off flame.
Allow temperature to come down to warm.
Add salt and pound in a mortar and pestle till a coarse paste is got Or use a small wet grinder, but do not use water.
Store in clean airtight glass bottle.
-------------------------------------------------------------------------------------
TAMARIND PASTE
Ingredients
500 gms tamarind
20 gms. salt
1 tbsp. oil
2 cups hot water
Method; Clean and soak tamarind in 1 cup hot water. Take care to remove any seeds that may be in tamarind.
Boil in same water after 20 minutes.Cool and blend in mixie till smooth.Add remaining water, mix well.
Pass through a sieve, removing any fibres, etc.
Heat oil in deep heavy pan.Add tamarind paste, bring to a boil.Add salt, cook till a thick coating consistency is got.
Cool completely, stirring in between, fill into clean sterile jar.
-------------------------------------------------------------------------------------
HOMEMADE QUARK
Ingredients:
1 liter milk
60 ml cultured buttermilk
Method; To make homemade quark you will need 2 days. But the actual work time is approx. 10 minutes. This recipe is for about 250 g / 8 oz quark. You can easily double or triple the recipe to make more quark. (for 1 kg / 2 lb., use 4 liters/1 Gallon of milk and 240 ml / 8 oz cultured buttermilk). The texture of the quark depends on how long you drain the quark. The quark is getting drier the longer it drains. You can make the quark smooth again by adding whey or milk. It is important that all utensils you are using are very clean.
Pour the milk (best if used 2% or higher) in a big plastic bowl with lid. Add 60 ml / 2 oz cultured buttermilk and stir well. Cover the milk mixture and let it stand at room temperature (22C / 72F) for 48 hours. You will get best results if you don't move the bowl. After 48 hours you've got soured milk (which you can also use). Place the covered bowl on a baking tray lined with a dishtowel. Put the baking tray in the middle rung of the oven. Set the temperature to 30-35 C / 86-95 F and heat the soured milk for about 120 minutes. Now you can see that the whey splits from the quark. The whey has a yellowish-green color. Put the cheesecloth in a strainer and the strainer in a bowl. Fill in the quark using a slotted spoon, tie the cheesecloth and hang the quark in a cool place to drain. You can keep the whey for a healthy drink. It's very healthy and good for the intestinal flora. Enjoy the whey plain or mix in some fruits (like a smoothie), veggies or green tea, just be creative. Store the quark and whey for approx. 5-7 days in the refrigerator. It depends on how cool the room temperature was when the quark was drained. The cooler the better.
-------------------------------------------------------------------------------------
HOMEMADE CREME FRAICHE
Ingredients:
200ml whipping cream
200ml sour cream
Method; It is very simple to prepare Creme Fraiche at home in your own kitchen. In a container/bowl (approx. 500ml (18 oz)) combine the sour cream and the heavy cream. Mix well with a wire whisk. Let stand uncovered at room temperature for 12 hours. Then cover the container/bowl with a lid and refrigerate. You can keep the Creme Fraiche in the refrigerator for a few days.
Tuesday, October 28, 2008
Schezuan Sauce for Cooking

This sauce is a delicate blend of fiery spices and condiments without which the chinese cooking would be incomplete.
Preparation time 10 minutes
Cooking time 5 minutes
Makes 1 CUP
Ingredients :
For the paste:
20 Dry red chillies (Kashmiri or Begdi which are rich in colour and not very spicy) OR Just 8 regular dry red chilli (the one which is very spicy and hot)
1/4 cup Garlic, chopped
Other ingredients
1 tbsp garlic, finely chopped
1 tsp green chillies, finely chopped
1/2 tbsp ginger, grated
2 tbsp onions, finely chopped
1 tsp celery finely chopped
1 cup clear vegetable stock
1 tbsp Cornflour starch mixed with 2 tbsps water
1 tbsp white vinegar
2 tsps sugar
a pinch of Ajinomoto powder (optional)
3 tbsps oil
Salt to taste
Method
For the paste, boil the dry red chillies and garlic and simmer for 8 to 10 minutes. Take off the heat and cool.
Drain out the water. Grind into a smooth paste in a blender using a little water. Keep it aside.
Heat the oil in a wok or a frying pan and saute the garlic, green chillies, ginger, onions and celery for 1 minute.
Add the paste and saute again for 1 minute.
Add the vegetable stock and mix well. Add the cornflour mixture, vinegar, sugar, Aginomoto and salt. Bring to a boil and keep aside.
Use as required.
Clear Vegetable stock
Chinese stock differs from French stock in the lack of spices. While a recipe for French stock might call for a pinch of thyme or a few garlic cloves, the chinese believe spicing masks the flavour of the stock. Seasonings are added later, depending on what the individual recipe calls for. This stock is used for soups and sauces to add more flavour to them.
Preparation time 5 minutes
Cooking time 20 minutes
makes 4 1/2 CUPS
Ingredients:
1/2 cup Cabbage, roughly chopped
1/2 cup Carrots, roughly chopped
1/4 cup Celery, chopped
2 tbsps Spring onions, chopped
3 to 4 Cauliflower florets
Method
Boil all the vegetables in 6 cups of water and simmer over a medium flame for 15 to 20 minutes, till it reduces to about 4 1/2 cups.
Allow the vegetables to settle at the bottom of the vessel and pour out the stock. Discard the vegetables.
Use as required.
Monday, July 21, 2008
Making Chapati - Indian Bread
Chapati or roti is the traditional flat Indian bread, normally eaten with curries or cooked vegetables. It is made most often from wheat flour, cooked on a flat or slightly concave iron griddle called a tawa. It is similar to a tortilla in appearance. Like breads around the world, chapati is a staple accompaniment to other foods, may be spread with ghee (clarified butter).

Here are the ingredients:
1 1/2 cups Whole wheat flour
1 1/2 cup All purpose flour(maida) [For a 100% whole wheat chapati, substitute this with wheat wheat flour]
1 cup Water
5tsp Oil(sunflower or vegetable)
1tsp Salt
2tsp Sugar
1 cup wheat flour in a large plate for dusting the dough while rolling it out
Oil for brushing the chapathi
Method:
Mix all the above ingredients and knead it well to form a soft non sticky dough. Rest it for about 1/2 an hour.
Divide the dough into small balls. Flour the surface, using a rolling-pin, roll out the dough into a thin,round patty, about 4 inches in diameter.
Brush some oil over the surface and fold it into half and then fold it again into a triangle.
Dust the triangle with little whole wheat flour and roll into a large, flat triangle.
Preheat a non stick pan or a tawa over medium heat. Place the rolled dough on the palm of one hand and flip it over on to the tawa. When the color changes on the top and bubbles appear, turn it over and brush some oil over the surface. Flip it over and again brush some oil over the flipped surface. Cook lightly on both sides. When both sides are done, use kitchen tongs (chimta) to remove the chapati from the skillet.
Chapatis are usually eaten with cooked dal (lentil soup) or vegetable (Indian curry) dishes, and pieces of the chapati are used to wrap around and pick up each bite of the cooked dish.
You can have chapati with palak paneer, mixed vegetable palya or any other North Indian curries..
Tips
This chapati can be stored in air-tight containers in the freezer for upto 2 months. Just defrost and heat it up on tava before use or just microwave on high for a minute.
Making Paneer- Indian cheese
I tried making this paneer for the first time and it turned out great!
The recipe goes like this..
Ingredients:
1 litre Milk
11/2tsp vinegar or 1/2tsp lemon juice or citric acid( i used lemon juice)
Preparation:
Boil the milk in a pan.
When it's boiling add lemon juice which is dissolved in 2 tbsp of water.
When milk curdles full turn off the gas and keep aside for 5 minutes.
Pour it on to a cotton/muslin cloth and squeeze the excess water.
When all the water is drained from the paneer place the cloth on a vessel which is turned upside down and place another vessel on top of the cloth. Pour water into the upper vessel so that there is extra weight on the cloth. keep this for an hour.
Note: Do not throw away the leftover water as it can be used for kneading chapati or paratha dough 


