
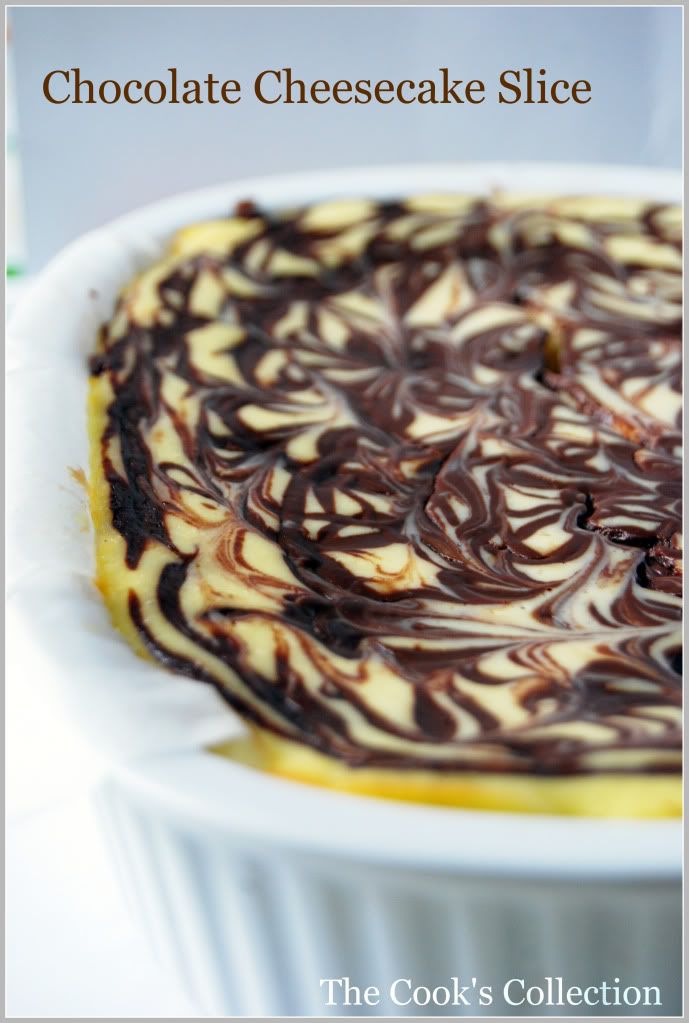
This is another delicious and wickedly indulgent treat that is best cut into fingers. I decided to bake this cake as soon as i saw this recipe in the book "Fresh Baked" with a lovely picture. This recipe is very quick with very easy to follow instructions and the result is in front of you. Its got a nice chocolate base topped with a lovely satiny cheesecake layer which is again decorated with a lacy melted chocolate. Any favorite chocolate biscuits can be used for the base. I used butter biscuits coated with dark chocolate which went very well with the cheesecake layer.
Use the exact sized baking pan for the recipe mentioned as this effects the thickness of the cheesecake. I also used a weighing machine to weigh the ingredients which gave me the perfect result.
Chocolate Cheesecake Slice
from Fresh Baked
preparation time: 20 minutes
cooking time 50-60 minutes
serves: 12-16
Ingredients:
250 gm (8 oz) Chocolate biscuits (any of your favorite)
100 gm (3 1/2 oz) unsalted butter, melted
50 gm (2 oz) dark chocolate
500 gm (1 lb) cream cheese
150 ml (1/4 pint) sour cream
3 eggs (i used large)
125 gm (4 oz) caster sugar (powdered sugar)
1 teaspoon vanilla extract
Method:
Put the chocolate biscuits in a food processor and process until smooth, then stir into the melted butter until evenly combined. Lightly oil and line a 18 x 25 cm (7 x 10 inch) cake tin with baking paper, allowing the paper to overhang the edges. Spoon the mixture into the prepared tin and spread flat. Chill while preparing the topping.
Put the chocolate in a bowl set over a pan of gently simmering water (do not let the bowl touch the water) and stir until it has melted. Keep warm. [If the chocolate turns too thick, add few teaspoons of sour cream to slightly liquidity it so that it would be easy to drizzle over the cheesecake layer. I filled this chocolate - sour cream mixture into a small zip lock cover. Made a small hole in the corner and this ended up with a very clean , hazel free drizzle.]
Put the cream cheese, sour cream, eggs, sugar and vanilla extract in a clean bowl and, using an electric beaters, beat together until smooth. Pour into the tin and drizzle over the melted chocolate, using a skewer to create a swirling pattern over the creamed mixture.
Bake in a preheated oven 150 deg C (300 deg F), Gas Mark 2, FOR 50 - 60 minutes until the mixture is firm, remove from the oven and leave to cool. Chill for 1 hour, then carefully remove the cheesecake from the tin and cut it into fingers.
Enjoy with a cup of hot coffee!
Tuesday, October 27, 2009
Chocolate Cheesecake Slice

Monday, April 27, 2009
Daring Bakers - Cheesecake
Daring Bakers April 2009 - Cheesecake Centerpiece


The recipe would fit for a 9" springform pan but i had a 7" pan. So i used the recipe for one 7" pan and used up the extra with a muffin pan, where i got another 6 muffin shaped cheese cakes.
2 Cups fruits, Chopped ( Strawberry, raspberry, blueberry, banana, grapes)


Tuesday, April 21, 2009
Paneer Kheer (Indian Cottage Cheese Pudding)
A simple yet an elegent dessert. When one thinks of Kheer one automatically relates it to rice kheer or semolina kheer. Here is a brilliant innovation, the "paneer kheer". As the name suggests this kheer is made with grated paneer that is cooked in milk along with some sugar and flavoured with cardamom powder. The dry fruits provides the crunch and enhances the taste also adding to the richness of the dessert. Corn flour has been added to help thicken the milk faster so as to reduce cooking time. Since dairy products are plentiful in North India, this dessert is an apt end to North Indian meal. This dessert is a great made ahead option to opt for.. Preparation time:5 minutes
Cooking time: 15 minutes
Serves:4
Ingredients required:
3 Cups milk
2 tbsp cornflour dissolved in 5 tbsp water
1/2 cup sugar
1 1/4 cups grated paneer (cottage cheese)
2 tbsp chopped pistachios
2 tbsp chopped almonds
1/2 tsp cardamom powder
To decorate:
4 tbsp Sweetened Condensed milk
Few roasted and chopped nuts on top
Combine milk and sugar in a broad non-stick pan. Simmer on a medium flame, while stirring continously, till the sugar dissolves completely.
Add the cornflour mixture and stir continously till the mixture thickens.
Add the paneer, pistachios, almonds and cardamom powder and mix well. Thats it!
Refrigerate for atleast an hour.
Serve Chilled with a spoon of condensed milk on top and decorate with roasted and chopped nuts.

Enjoy!!
Tuesday, April 14, 2009
Sweet Ricotta Pie
This dessert uses pasta frolla, a sweet Italian pie dough for the base and lattice. The filling used here in this recipe can be made in minutes. It uses just 5 ingredients and Anisette, a licorice-flavoured liqueur, is the traditional flavouring for this type of cheese cake, but you can use anise extract or alter the flavour completely by substituting vanilla or almond extract, using brandy, or mixing in a little fruit-flavoured liqueur, such as Grand Marnier. I made a mini version of this recipe as i had to serve just 2 people. I reduced the recipe into half (reduced all the ingredients for filling by half and used just 1 large egg) and used 4 mini tart molds instead of a large one. I loved this dessert as it has a light cheese filling and a crisp cookie feel base. I freezed half the recipe of pasta frolla and will be using it for other recipes.
Recipe adapted from "Baking With Julia"
Ingredients required;
1 pound, OR 450 gms whole milk ricotta
1/3 cup sugar, ( i added a little extra for the sweetness)
1 tbsp anisette or 1 tbsp vanilla extract
3 large eggs, beaten
1/2 tsp cinnamon
1 recipe Pasta Frolla
Method;
Stir in ricotta, sugar, anisette, and eggs together in a bowl until smooth; set aside.
Position a rack in the lower third of the oven and preheat the oven to 350 deg F. Butter a 9-inch glass pie plate. (If you dont have a glass pie plate, use metal, but increase the oven temperature to 375 deg F.) (I used mini tart molds)
Working with 2/3 rd of the dough, knead it into a disc and roll it on a lightly floured work surface into a 12 inch circle. Transfer the dough to the pie plate and press it gently against the bottom and up the sides of the plate. Dont worry if the dough tears-just press it back together. Use the dull side of the knife to trim the excess dough even with the rim. Srape the filling into the pie shell, smooth the top, and dust with cinnamon.
Forming the lattice
Knead and shape the remaining piece of dough into a block and roll it on a lightly floured surface into a 9-inch square. Using a pizza or pastry cutter ( a ruffle-edged pastry wheel is nice) or a thin sharp knife, cut the dough into 12 even strips. To form the lattice top, lay 6 of the strips across the pie at 1 1/4 inch intervals, then crisscross with the remaining strips, placing them diagonally across the first strips. Trim the ends of the lattice even with the edge of the pan.
Baking the Pie
Bake for 35 to 40 minutes, or until the crust is golden and the filling is firm and slightly puffed. Transfer the pie to a rack and cool completely before serving. Storing ;
Leftovers can be kept, well covered in the refrigerator, for up to 3 days. Serve slightly chilled or at room temperature.
Friday, March 27, 2009
Daring Bakers - Lasagne of Emilia-Romagna (Lasagne Verdi al Forno)
The March 2009 challenge is hosted by Mary of Beans and Caviar, Melinda of Melbourne Larder and Enza of Io Da Grande. They have chosen Lasagne of Emilia-Romagna from The Splendid Table by Lynne Rossetto Kasper as the challenge.
 Lasagne is a dish that has successfully transcended borders and is today made around the world, albeit with many variations from the Italian original. Even within Italy, there are many variations and each region has its own lasagne tradition. But, as Lynne explains in her introduction to the recipe –and Enza, as our Italian expert for this dish, also agrees - the dish should always be a “vivid expression of the ‘less is more’ philosophy of cooking. Mere films of béchamel sauce and meat ragu coat the sheerest spinach pasta. Parmigiano-Reggiano cheese dusts each layer. There is nothing more; no ricotta, no piling on of meats, vegetables or cheese; little tomato, and no hot spice. Baking performs the final marriage of flavours. The results are splendid.”
(Serves 8 to 10 as a first course, 6 to 8 as a main dish)
Preparation Time: 15 minutes to assemble and 40 minutes cooking time
10 quarts (9 litres) salted water
1 recipe Spinach Pasta cut for lasagna (recipe follows)#1
1 recipe Bechamel Sauce (recipe follows)#2
1 recipe Vegetarian Bolognese Sauce
1 cup (4 ounces/125g) freshly grated Parmigiano-Reggiano
1 cup grated Mozzarella cheese (my touch)
Method
Working Ahead:
The ragu and the béchamel sauce can be made up to three days ahead. The ragu can also be frozen for up to one month. The pasta can be rolled out, cut and dried up to 24 hours before cooking. The assembled lasagne can wait at room temperature (20 degrees Celsius/68 degrees Fahrenheit) about 1 hour before baking. Do not refrigerate it before baking, as the topping of béchamel and cheese will overcook by the time the center is hot.
Assembling the Ingredients:
Have all the sauces, rewarmed gently over a medium heat, and the pasta at hand. Have a large perforated skimmer and a large bowl of cold water next to the stove. Spread a double thickness of paper towels over a large counter space. Preheat the oven to 350 degrees Fahrenheit (180 degrees Celsius). Oil or butter a 3 quart (approx 3 litre) shallow baking dish.
Cooking the Pasta:
Bring the salted water to a boil. Drop about four pieces of pasta in the water at a time. Cook about 2 minutes. If you are using dried pasta, cook about 4 minutes, taste, and cook longer if necessary. The pasta will continue cooking during baking, so make sure it is only barely tender. Lift the lasagne from the water with a skimmer, drain, and then slip into the bowl of cold water to stop cooking. When cool, lift out and dry on the paper towels. Repeat until all the pasta is cooked.
.jpg)
Assembling the Lasagne:
Spread a thin layer of béchamel over the bottom of the baking dish. Arrange a layer of about four overlapping sheets of pasta over the béchamel. Spread a thin layer of béchamel (about 3 or 4 spoonfuls) over the pasta, and then an equally thin layer of the ragu. Sprinkle with about 1&1/2 tablespoons of the béchamel and about 1/3 cup of the cheese. Repeat the layers until all ingredients are used, finishing with béchamel sauce and topping with a generous dusting of cheese.
 Baking and Serving the Lasagne:
 Cover the baking dish lightly with foil, taking care not to let it touch the top of the lasagne. Bake 40 minutes, or until almost heated through. Remove the foil and bake another 10 minutes, or until hot in the center (test by inserting a knife – if it comes out very warm, the dish is ready). Take care not to brown the cheese topping. It should be melted, creamy looking and barely tinged with a little gold. Turn off the oven, leave the door ajar and let the lasagne rest for about 10 minutes. Then serve.

This is not a solid lasagne, but a moist one that slips a bit when it is cut and served.
#1 Spinach Egg Pasta (Pasta Verde)
Preparation: 45 minutes
Makes enough for 6 to 8 first course servings or 4 to 6 main course servings, equivalent to 1 pound (450g) dried boxed pasta.

2 jumbo eggs (2 ounces/60g or more each)
10 ounces (300g) fresh spinach, rinsed dry, and finely chopped; OR 6 ounces (170g) frozen chopped spinach, defrosted and squeezed dry
3 & 1/2 cups (14 ounces/400g) all purpose unbleached (plain) flour (organic stone ground preferred)
Working by Hand:
Equipment
A roomy work surface, 24 to 30 inches deep by 30 to 36 inches (60cm to 77cm deep by 60cm to 92cm). Any smooth surface will do, but marble cools dough slightly, making it less flexible than desired.
A pastry scraper and a small wooden spoon for blending the dough.
A wooden dowel-style rolling pin. In Italy, pasta makers use one about 35 inches long and 2 inches thick (89cm long and 5cm thick). The shorter American-style pin with handles at either end can be used, but the longer it is, the easier it is to roll the pasta.
Note: although it is not traditional, Enza has successfully made pasta with a marble rolling pin, and this can be substituted for the wooden pin, if you have one.
Plastic wrap to wrap the resting dough and to cover rolled-out pasta waiting to be filled. It protects the pasta from drying out too quickly.
A sharp chef’s knife for cutting pasta sheets.
Cloth-covered chair backs, broom handles, or specially designed pasta racks found in cookware shops for draping the pasta.
Mixing the dough:
Mound the flour in the center of your work surface and make a well in the middle. Add the eggs and spinach. Use a wooden spoon to beat together the eggs and spinach. Then gradually start incorporating shallow scrapings of flour from the sides of the well into the liquid. As you work more and more flour into the liquid, the well’s sides may collapse. Use a pastry scraper to keep the liquids from running off and to incorporate the last bits of flour into the dough. Don’t worry if it looks like a hopelessly rough and messy lump.
Kneading:
With the aid of the scraper to scoop up unruly pieces, start kneading the dough. Once it becomes a cohesive mass, use the scraper to remove any bits of hard flour on the work surface – these will make the dough lumpy. Knead the dough for about 3 minutes. Its consistency should be elastic and a little sticky. If it is too sticky to move easily, knead in a few more tablespoons of flour. Continue kneading about 10 minutes, or until the dough has become satiny, smooth, and very elastic. It will feel alive under your hands. Do not shortcut this step. Wrap the dough in plastic wrap, and let it relax at room temperature 30 minutes to 3 hours.
Stretching and Thinning:
If using an extra-long rolling pin work with half the dough at a time. With a regular-length rolling pin, roll out a quarter of the dough at a time and keep the rest of the dough wrapped. Lightly sprinkle a large work surface with flour. The idea is to stretch the dough rather than press down and push it. Shape it into a ball and begin rolling out to form a circle, frequently turning the disc of dough a quarter turn. As it thins outs, start rolling the disc back on the pin a quarter of the way toward the center and stretching it gently sideways by running the palms of your hands over the rolled-up dough from the center of the pin outward. Unroll, turn the disc a quarter turn, and repeat. Do twice more.
Stretch and even out the center of the disc by rolling the dough a quarter of the way back on the pin. Then gently push the rolling pin away from you with one hand while holding the sheet in place on the work surface with the other hand. Repeat three more times, turning the dough a quarter turn each time.
Repeat the two processes as the disc becomes larger and thinner. The goal is a sheet of even thickness. For lasagne, the sheet should be so thin that you can clearly see your hand through it and see colours. Cut into rectangles about 4 by 8 inches (10 x 20 cm). Note: Enza says that transparency is a crucial element of lasagne pasta and the dough should be rolled as thinly as possible. She says this is why her housekeeper has such strong arms!
Dry the pasta at room temperature and store in a sealed container or bag.
#2 Bechamel Sauce

Preparation Time: 15 minutes
4 tbsp (2 ounces/60g) unsalted butter
4 tbsp (2 ounces/60g) all purpose unbleached (plain) flour, organic stone ground preferred
2 & 2/3 cups (approx 570ml) milk
Salt and freshly ground pepper to taste
Freshly grated nutmeg to taste
Method:
Using a medium-sized saucepan, melt the butter over low to medium heat. Sift over the flour, whisk until smooth, and then stir (without stopping) for about 3 minutes. Whisk in the milk a little at a time and keep the mixture smooth. Bring to a slow simmer, and stir 3 to 4 minutes, or until the sauce thickens. Cook, stirring, for about 5 minutes, until the sauce thickens. Season with salt, pepper, and a hint of nutmeg.
Tuesday, January 27, 2009
Onion-Tomato-Cheese Galette
This rustic tart has the look of a mediteranean pizza. The crust is a wonderful cornmeal-crunchy dough, rolled into a thin circle and drawn up in pleats and rufles over the filling, caramalised onions and a blend of cheeses topped with sliced garden tomatoes, red and juicy. Because of the cornmeal in the dough, the crust will stay crisp enough for this galette to be served either warm or at room temperature. It will travel, so think of it when you're headed off on a picnic or want to bring friends a lovely something to have with drinks.

For this recipe you'll need..
1/4 recipe Galette Dough, chilled
1/2 cup Ementaler Cheese, shredded
1/2 cup Mozzarella, shredded
Few basil leaves, fresh or frozen
1 or 2 firm but ripe plum tomatoes, cut into 1/4-inch-thick slices
1 Onion, medium sized, cut into slices, lengthwise
1 tbsp Olive oil
1 Egg
1 tbsp Milk
Here you start Position a rack in the lower third of the ovan and preheat the oven to 200 deg C. Line a baking sheet with parchment paper.
Put the dough on a lightly floured surface and roll in into an 9-inch circle. Since the dough is soft,you'll need to lift it now and then and toss some flour under it and over the top. Roll the dough up around your rolling pin and unroll onto the prepared baking sheet.
Making the filling Put the onions and olive oil in a skillet over medium heat. Add a pinch of salt and keep stirring till the onions turn translucent and soft. Set aside and let cool.
Toss the cheeses and basil together in a small bowl and set aside.
Spread the onions on the rolled-out dough, leaving an inch order. Place the tomatoes in concentric circles, one slice slightly overlapping the last, on top of the onions.
Scatter the cheeses and basil mixture over the tomatoes.
Fold the uncovered border of dough up over the filling, allowing the dough to pleat as you lift it up and work your way around the galette. (Because you're folding a wide edge of dough over a smaller part of the circle, it will pleat naturally- just go with it.) Combine the egg and a tbsp of milk together. Brush on top of the pleated galette.
Baking the galette Bake the galette for 35 to 40 minutes, or until the pastry is golden and crisp and the cheese is bubbly. Transfer the baking sheet to a cooling rack and let the galette rest on the sheet for 10 miutes. Servve warm or at room temperature, garnish with fresh basil leaves.

Storing The galette can be kept at room temperatute for several hours, but it is best served the day it is made.
Tuesday, December 23, 2008
Brinjal Tomato Gratin
A gratin with a combination of brinjal, tomato and cheese can never be bad. This gratin can be served warm or at room temperature.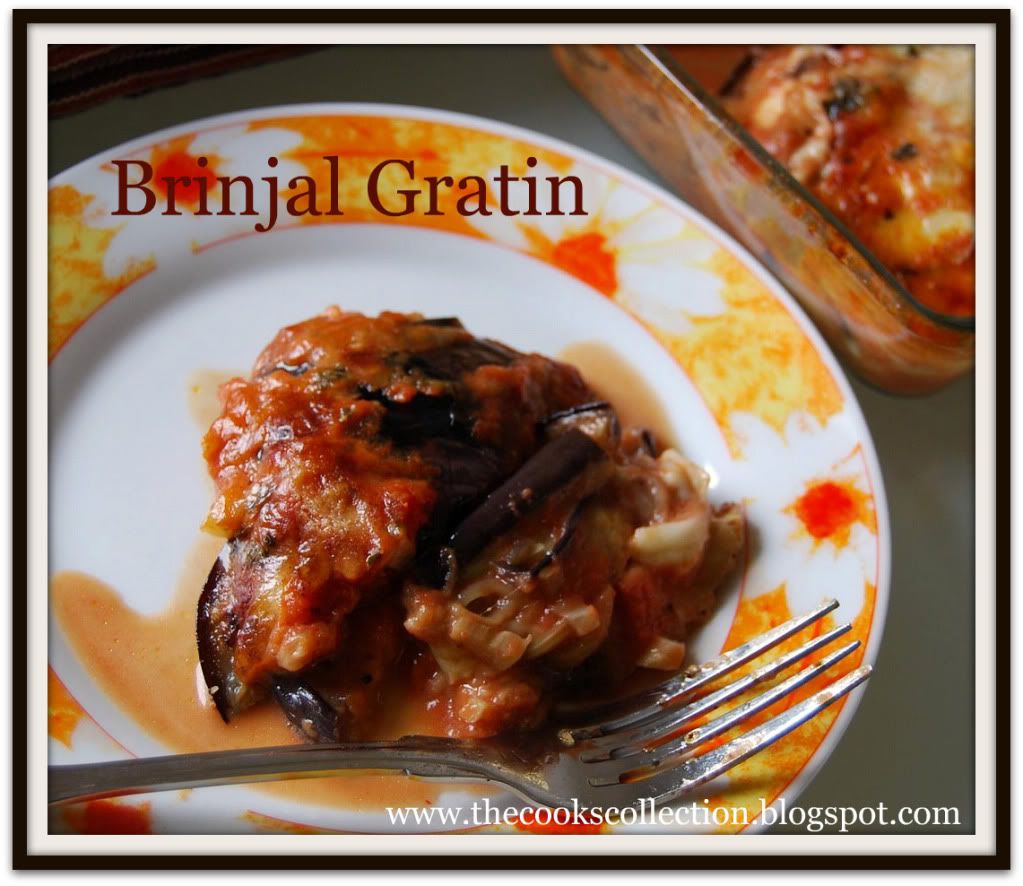
3 - 4 tbsp Olive oil
2 Cloves of Garlic, crushed
2 Big Brinjals
100 gm Mozzarella, Cut into thin layers
200gm Tomato puree
50 gms Grated Parmesan Cheese
Method
Take 2 tbsp of oil in a large pan and fry the crushed garlic for about 30 seconds.
Cut the brinjal in lengthwise into 1cm thick layers. Fry these layers in the same pan with the garlic. Fry each side for about 3 to 4 minutes. Use rest of the oil and fry all the pieces.
Take the brinjal layers out of the pan and using a kitchen tissue,drain off the excess oil.
In a deep casserole or gratin dish, arrange one layer of brinjal followed by a layer of mozzarella and a part of tomato puree. Follow the layers till all the brinjal and cheese gets over. Top the upper layer with the tomato puree.
Sprinkle the parmesan on top and bake a 200 deg C for 30 minutes.
Serve hot or cold..
Enjoy!!
Tuesday, November 11, 2008
Mini-Torteletts
These Torteletts have a great combination of the crispy crust and ineffable light filling. Tastes great when warm. Its a lovely dessert to be opted during parties.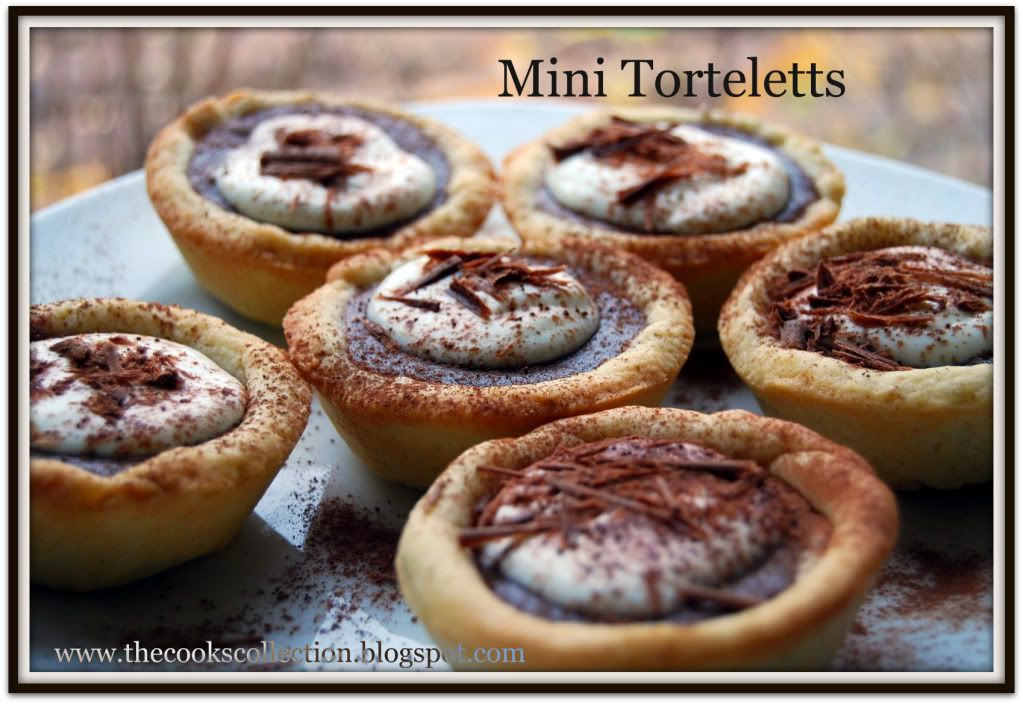
You'll need the following ingredients
175 gm All purpose flour
80 gm Butter
20 gm Sugar
1 tbsp Water
For the Filling
100gm Cream cheese
25 gm Sugar
1 small egg, lightly beaten
50 gm Dark bitter chocolate , melted
For Decorating
100 gm Whipped cream
Chocalte Shavings
Coco powder, to sprinkle
Mehod
Sieve the flour. Cut the butter into small pieces and rub it into the flour till you get a crumble texture. Add the sugar and water to form a soft dough. Wrap the dough ina plastic wrap and refrigerate for 15 minutes.
Place the dough onto a lightly floured surface and roll it.
Cut the rolled dough into 18 small circles and place them onto a mini muffin tray. you can also make big Torteletts that can fit into your regular muffin tray.

Mix together the cream cheese and sugar. Add in the egg and the melted chocolate. Mix well till no lumps are formed.
Fill in the cream cheese and chocolate mixture into the muffin tray onto the dough.

Bake them in a preheated oven of 190 deg C for 15 minutes, till the base is crisp and the filling is firm. Cool on a wire rack.


Place the Torteletts in a cool place. Whip the cream till it holds stiff peaks. Place a spoon full of whipped cream onto the Torteletts. Decorate the Torteletts with few chocolate shavings and sprinkle some coco powder on top. Enjoy the lovely dessert :)
Tuesday, October 21, 2008
German Cheese Cake
This is an awesome dessert for sweet lovers.. This cheese cake is very different from the other cheese cakes. It uses Indian cottage cheese(paneer) and sweetened condensed milk for the sweetness. Even the crust is slightly salty and goes great with the sweetened cheese on top. The topmost layer gives a light crunchy feel. Altogether its a lovely dessert. Preparation time 25 - 30 minutes
Cooking time 1 hour
Serves 8 - 10
Here are the ingredients..
Pastry:
250 gms All purpose flour
125 gms Cold salted butter (or salt free butter + 1/4 tsp Salt)
6-8 tbsp Cold water
Filling:
1/2 Tin Sweetened Condensed Milk (Milkmaid)
250gm Paneer
4 Egg yolks
1/2 tsp Lemon juice
30 gms Ground almonds
50 gms Chopped dried grapes
50 gms Finely chopped candied peel(Orange or lemon)
Meringue:
1 Egg white
50 gms Powdered Sugar
Method
Preheat the oven to 180 deg C.
Cut cold butter into small pieces.
Using a palette knife rub butter into the flour.
Sprinkle cold water over the flour and using a palette knife combine into a ball.
With medium handling, roll into 1/8" thick pastry.
Lift the pastry over the rolling pin, drop into pie dish and line it. Trim off the extra dough.
Prick the entire pastry with a fork (to prevent puffing). Bake blind at 180 deg C for 10-15 minutes. Remove from oven.
Reset the oven at 140 deg C.
Blend together, paneer, egg yolks and condensed milk till smooth and creamy. I crumbled the paneer instead of making a smooth paste to get the feel of it, you can follow either of the method(crumbly or creamy). Add almond powder, dry grapes, candied peels and lemon juice. Mix well, pour into the baked pastry case.
Whisk egg white till stiff, add half the sugar gradually and continue to whisk till stiff peak stage. Fold in the rest of the sugar and pipe a fine lattice of meringue over the pie.
Return to oven and bake at 140 deg C for 45 minutes or till meringue is crisp.
Serve hot or chilled with cream.
Enjoy.
Tuesday, October 7, 2008
Onion Mozzarella Tartlets
These Tartlets are one of my favourite, quick and easy. Cheese, Caramalised onions and peppers on soft ,warm and flaky puff pasty gives a wonderful taste. Can be taken as a starter or as a snack. I simply hope you enjoy it as much as i did..
You'll need..
Ingredients:
250 gm Puff pastry sheets
2 Red Onions
1 Red Capsicum
8 Cherry tomatoes, halved
100 gms Mozzarella Cheese
1 tsp Dried Thyme leaves
A tsp of Olive oil
Salt to taste
Here you go..
First preheat the oven to 200 deg C.
Take out the puff pastry sheets from the freezer and let it sit for about 10 minutes.
Meanwhile, cut the onions and peppers lengthwise. Take oil in a pan and fry the onions and peppers with salt to taste on a medium heat till they turn soft. Remove and keep aside.
Now cut the puff pasty sheets into 7 - 8 cm long squares. Cut down the edges of the puff pasty sheets, about 1/2 a centimeter on all the sides. Apply some water on the borders of the sheets and place the long sut pieces on the borders.
Place an aluminium foil (cut into square) in the center of the squares and bake for 10 minutes.
Now remove the foil and bake again. Dough might stick to the foil while taking it out but do not worry. take it out carefully and bake for another 5 minutes.
Now place the onion and pepper stuffing in the center of the puff pasty. Slightly push the stuffing inside. Place the cherry tomatoes and top up with the mozzarella cheese and thyme leaves.
Now bake again for 15 minutes or till the crust turns golden brown.
Enjoy!!


