
DARING BAKER CHALLENGE FEBRUARY, 2010
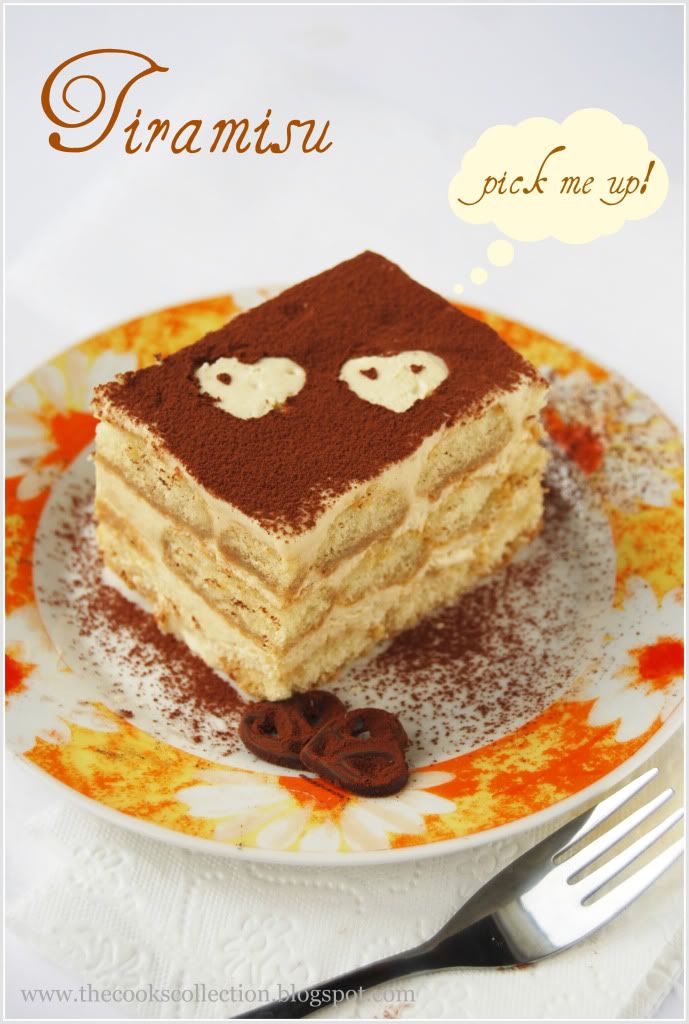
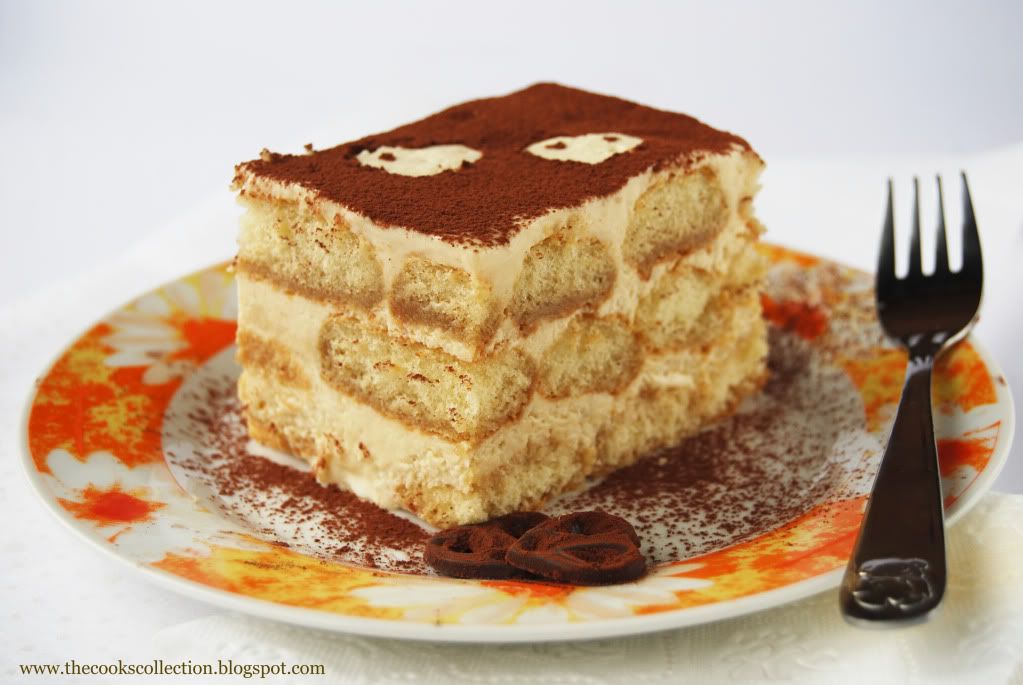
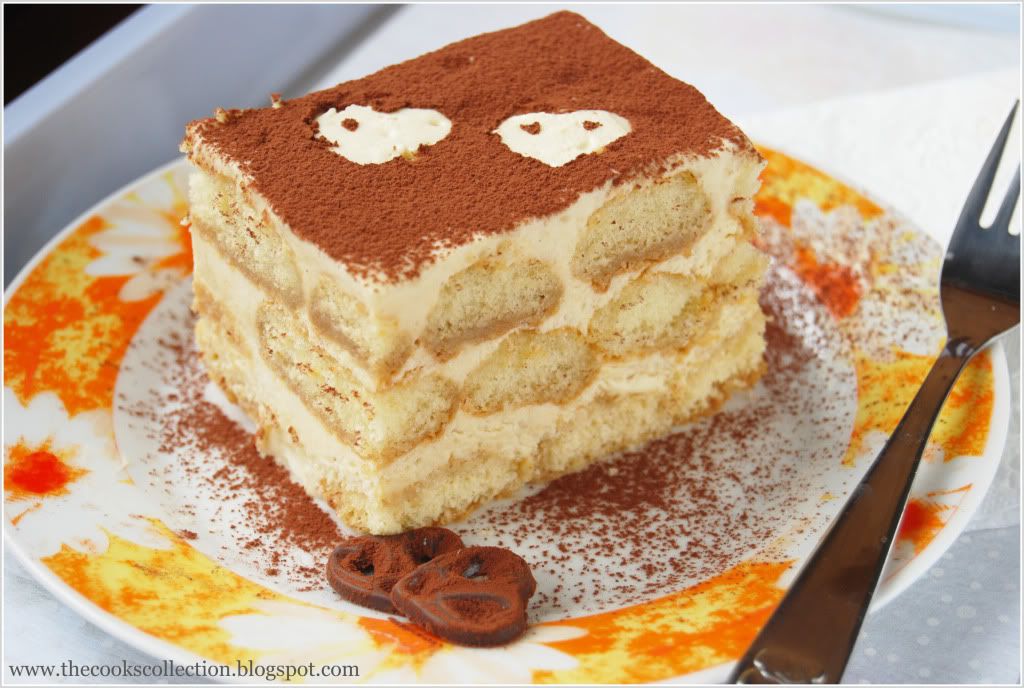
This divine Italian dessert translates to mean ‘pick me up’, supposedly referring to the ‘kick’ provided by the strong coffee, sugar and alcohol in it!
On the other hand, a slight mistake in spelling it as "Tiramuso" could end up meaning that you were "pulling a sulky face"! Classic tiramisu is made of alternate layers of espresso soaked ladyfinger biscuits and a cream made from mascarpone cheese and zabaglione (an egg custard).
The perfect Tiramisu is a balance of flavors of a sweet zabaglione, strong coffee, marsala wine, creamy mascarpone cheese and the dusting of unsweetened cocoa.
So when, where and how was tiramisu born?
Tiramisu is said to have its origins in Treviso (Italy), and there are quite a few stories about how it came to be created.
One story traces the tiramisu as far back as the Renaissance claiming that it was first made in honour of the visit of Grand Duke Cosimo di Medici to Tuscany. Yet another one points to the tiramisu being an adaptation of the "Zuppa Inglese" referring to the sponge cake and cream layered English Trifle.
However, experts in this area generally agree that the tiramisu as we know it today, was born in the ‘70s.
Some believe that the Tiramisu was created in the the Le Beccherie (a restaurant in Treviso). Ohters suggest that Tiramisu was first made in 1971 by an Italian baker named Carminantonio Iannaccone in a small bakery in Treviso, Italy.
The February 2010 Daring Bakers’ challenge was hosted by Aparna of My Diverse Kitchen and Deeba of Passionate About Baking. They chose Tiramisu as the challenge for the month. Their challenge recipe is based on recipes from The Washington Post, Cordon Bleu at Home and Baking Obsession.
PREPARATION TIME:
Tiramisu is made up of several components which can be made separately and ahead of time and put together the day before serving.
Making tiramisu from scratch requires about 2 to 3 days (including refrigeration) from when you start making the mascarpone to the time the tiramisu is served. So this challenge requires some prior planning.
Please read the instructions as you need to begin making the mascarpone at least a day in advance.
The zabaglione & pastry cream also need 4 hours to an overnight for chilling, as does the main dessert. The flavours mature after an overnight rest, and the dessert can be kept refrigerated for 2-3 days.
Once assembled, the tiramisu can be frozen till you need to serve it, in case you are not serving it immediately.
EQUIPMENT REQUIRED:
A double boiler (a stainless steel bowl that fits inside a large saucepan/ pot without touching the bottom will do)
Two or three large mixing bowls
Whisk
A medium sized heavy bottomed pan
Fine meshed strainer (to remove lumps from pastry cream, if any)
Electric mixer, hand held
Serving dish (or dishes) of choice (8" by 8" should be fine)
Spatula for folding and spoons as required
Plastic wrap/ clingfilm
Baking sheets
Parchment paper or nonstick liners
Pastry bag (can be disposable)
Plain 3/4" pastry bag tip or cut the end of pastry bag to this size (If you don’t have a pastry bag and/or tips, you can use a Ziploc bag with the corner snipped off)
Oven
Cooling rack
Thin-bladed spatula for removing ladyfinger biscuits from the baking sheets
Instant-read thermometer (optional)
Strainer
Cheesecloth or cotton napkin for draining mascarpone
Fine-mesh strainer for shaking cocoa powder on tiramisu
TIRAMISU
(Recipe source: Carminantonio's Tiramisu from The Washington Post, July 11 2007 )
This recipe makes 6 servings
Ingredients:
For the zabaglione:
2 large egg yolks
3 tablespoons sugar/50gms
1/4 cup/60ml Marsala wine (or port or coffee)
1/4 teaspoon/ 1.25ml vanilla extract
1/2 teaspoon finely grated lemon zest
For the vanilla pastry cream:
1/4 cup/55gms sugar
1 tablespoon/8gms all purpose flour
1/2 teaspoon finely grated lemon zest
1/2 teaspoon/ 2.5ml vanilla extract
1 large egg yolk
3/4 cup/175ml whole milk
For the whipped cream:
1 cup/235ml chilled heavy cream (we used 25%)
1/4 cup/55gms sugar
1/2 teaspoon/ 2.5ml vanilla extract
To assemble the tiramisu:
2 cups/470ml brewed espresso, warmed
1 teaspoon/5ml rum extract (optional)
1/2 cup/110gms sugar
1/3 cup/75gms mascarpone cheese
36 savoiardi/ ladyfinger biscuits (you may use less)
2 tablespoons/30gms unsweetened cocoa powder
Method:
For the zabaglione:
Heat water in a double boiler. If you don’t have a double boiler, place a pot with about an inch of water in it on the stove. Place a heat-proof bowl in the pot making sure the bottom does not touch the water.
In a large mixing bowl (or stainless steel mixing bowl), mix together the egg yolks, sugar, the Marsala (or espresso/ coffee), vanilla extract and lemon zest. Whisk together until the yolks are fully blended and the mixture looks smooth.
Transfer the mixture to the top of a double boiler or place your bowl over the pan/ pot with simmering water. Cook the egg mixture over low heat, stirring constantly, for about 8 minutes or until it resembles thick custard. It may bubble a bit as it reaches that consistency.
Let cool to room temperature and transfer the zabaglione to a bowl. Cover and refrigerate at least 4 hours or overnight, until thoroughly chilled.
For the pastry cream:
Mix together the sugar, flour, lemon zest and vanilla extract in a medium heavy-bottomed saucepan. To this add the egg yolk and half the milk. Whisk until smooth.
Now place the saucepan over low heat and cook, stirring constantly to prevent the mixture from curdling.
Add the remaining milk a little at a time, still stirring constantly. After about 12 minutes the mixture will be thick, free of lumps and beginning to bubble. (If you have a few lumps, don’t worry. You can push the cream through a fine-mesh strainer.)
Transfer the pastry cream to a bowl and cool to room temperature. Cover with plastic film and refrigerate at least 4 hours or overnight, until thoroughly chilled.
For the whipped cream:
Combine the cream, sugar and vanilla extract in a mixing bowl. Beat with an electric hand mixer or immersion blender until the mixture holds stiff peaks. Set aside.
To assemble the tiramisu:
Have ready a rectangular serving dish (about 8" by 8" should do) or one of your choice.
Mix together the warm espresso, rum extract and sugar in a shallow dish, whisking to mix well. Set aside to cool.
In a large bowl, beat the mascarpone cheese with a spoon to break down the lumps and make it smooth. This will make it easier to fold. Add the prepared and chilled zabaglione and pastry cream, blending until just combined. Gently fold in the whipped cream. Set this cream mixture aside.
Now to start assembling the tiramisu.
Workings quickly, dip 12 of the ladyfingers in the sweetened espresso, about 1 second per side. They should be moist but not soggy. Immediately transfer each ladyfinger to the platter, placing them side by side in a single row. You may break a lady finger into two, if necessary, to ensure the base of your dish is completely covered.
Spoon one-third of the cream mixture on top of the ladyfingers, then use a rubber spatula or spreading knife to cover the top evenly, all the way to the edges.
Repeat to create 2 more layers, using 12 ladyfingers and the cream mixture for each layer. Clean any spilled cream mixture; cover carefully with plastic wrap and refrigerate the tiramisu overnight.
To serve, carefully remove the plastic wrap and sprinkle the tiramisu with cocoa powder using a fine-mesh strainer or decorate as you please. Cut into individual portions and serve.
LADYFINGERS/ SAVOIARDI BISCUITS
(Source: Recipe from Cordon Bleu At Home)
This recipe makes approximately 24 big ladyfingers or 45 small (2 1/2" to 3" long) ladyfingers.
Ingredients:
3 eggs, separated
6 tablespoons /75gms granulated sugar
3/4 cup/95gms cake flour, sifted (or 3/4 cup all purpose flour + 2 tbsp corn starch)
6 tablespoons /50gms confectioner's sugar,
Method:
Preheat your oven to 350 F (175 C) degrees, then lightly brush 2 baking sheets with oil or softened butter and line with parchment paper.
Beat the egg whites using a hand held electric mixer until stiff peaks form. Gradually add granulate sugar and continue beating until the egg whites become stiff again, glossy and smooth.
In a small bowl, beat the egg yolks lightly with a fork and fold them into the meringue, using a wooden spoon. Sift the flour over this mixture and fold gently until just mixed. It is important to fold very gently and not overdo the folding. Otherwise the batter would deflate and lose volume resulting in ladyfingers which are flat and not spongy.
Fit a pastry bag with a plain tip (or just snip the end off; you could also use a Ziploc bag) and fill with the batter. Pipe the batter into 5" long and 3/4" wide strips leaving about 1" space in between the strips.
Sprinkle half the confectioner's sugar over the ladyfingers and wait for 5 minutes. The sugar will pearl or look wet and glisten. Now sprinkle the remaining sugar. This helps to give the ladyfingers their characteristic crispness.
Hold the parchment paper in place with your thumb and lift one side of the baking sheet and gently tap it on the work surface to remove excess sprinkled sugar.
Bake the ladyfingers for 10 minutes, then rotate the sheets and bake for another 5 minutes or so until the puff up, turn lightly golden brown and are still soft.
Store them in an airtight container till required. They should keep for 2 to 3 weeks.
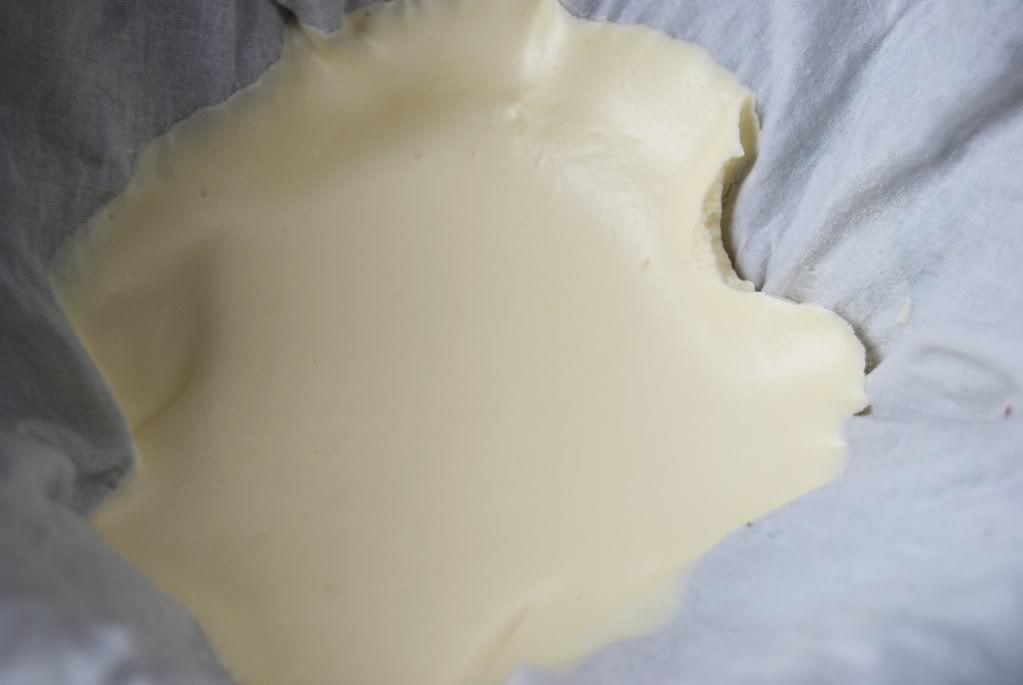
MASCARPONE CHEESE
(Source: Vera’s Recipe for Homemade Mascarpone Cheese)
This recipe makes 12oz/ 340gm of mascarpone cheese
Ingredients:
474ml (approx. 500ml)/ 2 cups whipping (36 %) pasteurized (not ultra-pasteurized), preferably organic cream (between 25% to 36% cream will do)
1 tablespoon fresh lemon juice
Method:
Bring 1 inch of water to a boil in a wide skillet. Reduce the heat to medium-low so the water is barely simmering. Pour the cream into a medium heat-resistant bowl, then place the bowl into the skillet. Heat the cream, stirring often, to 190 F. If you do not have a thermometer, wait until small bubbles keep trying to push up to the surface.
It will take about 15 minutes of delicate heating. Add the lemon juice and continue heating the mixture, stirring gently, until the cream curdles. Do not expect the same action as you see during ricotta cheese making. All that the whipping cream will do is become thicker, like a well-done crème anglaise. It will cover a back of your wooden spoon thickly. You will see just a few clear whey streaks when you stir. Remove the bowl from the water and let cool for about 20 minutes. Meanwhile, line a sieve with four layers of dampened cheesecloth and set it over a bowl. Transfer the mixture into the lined sieve. Do not squeeze the cheese in the cheesecloth or press on its surface (be patient, it will firm up after refrigeration time). Once cooled completely, cover with plastic wrap and refrigerate (in the sieve) overnight or up to 24 hours.
Vera’s notes: The first time I made mascarpone I had all doubts if it’d been cooked enough, because of its custard-like texture. Have no fear, it will firm up beautifully in the fridge, and will yet remain lusciously creamy.
Keep refrigerated and use within 3 to 4 days.
NOTES/ TIPS:
1. If you cannot find Marsala, port wine is considered a good substitute.
2. If you would rather not use alcohol in your tiramisu due to diet restrictions or because you want to serve it to children, you may replace the Marsala with an equal amount of espresso or coffee.
3. Many people, especially those who are not excessively fond of coffee, might find brewed espresso very strong. In this case, please feel free to dilute the espresso or coffee to the desired strength.
4. It is generally suggested that cream with 25% fat is best for making mascarpone, but 36% works just as well.
5. We both used lime juice. Deeba has a recipe for mascarpone posted on her blog here.
6. The mascarpone recipe below is for approximately 340gms of mascarpone. The tiramisu recipe requires only 1/3 cup/75gms so you may scale down the recipe to requirement or put the extra mascarpone cheese to other equally good use. (100gms cream will yield approximately 75gms mascarpone)
7. While using the double boiler to make the mascarpone as well as the zabaglione, always ensure that the bottom of the bowl on top doesn't touch the bottom of the lower one. It is important to use a stainless steel bowl to pour your cream into, while making the mascarpone.
8. Ladyfinger batter is very fragile so fold in the flour and yolks very carefully into the meringue so that the whites don't lose their volume.
9. It might be a good idea to decide the size of the dish in which you intend to set the dessert, and make the fingers to a size which would fit that dish. This makes it easier when assembling the tiramisu later. Do remember that ladyfingers/ savioardi puff up a little while baking.
10. Ladyfinger biscuits may be stored up to a week in an airtight container. We both made the savoiardi fingers 4-5 days in advance, and stored them in an airtight box in a cool place (or the refrigerator).
11. We both made the zabaglione & pastry cream the previous day, and assembled the tiramisu the next morning. I (Aparna) then froze my tiramisu for 7 days before decorating and serving it.
12. Placing the bowl (in which cream is to be whipped) and the beaters of the hand held electric mixer in the fridge for about 1/2 to 1 hour before hand makes the cream whip up very well.
13. Do not dip the ladyfinger/ savoiardi into the coffee solution for more than ONE second, or they might become very fragile & disintegrate. Extra soaking is likely to spoil the end product, making it soggy. I (Aparna) dipped my biscuits only on one side and found they soaked up more than enough coffee solution.
14. If you would like to de-mould your tiramisu from your dish (cutting can be easier and neater this way, you can line your dish with plastic wrap (leaving a little extra on the sides of the dish) and then start assembling your tiramisu. Once the tiramisu sets in the refrigerator, you can use the overhang to pull the tiramisu out of the dish.
Saturday, February 27, 2010
Tiramisu ~ Heaven on a Dessert Plate!

Friday, November 27, 2009
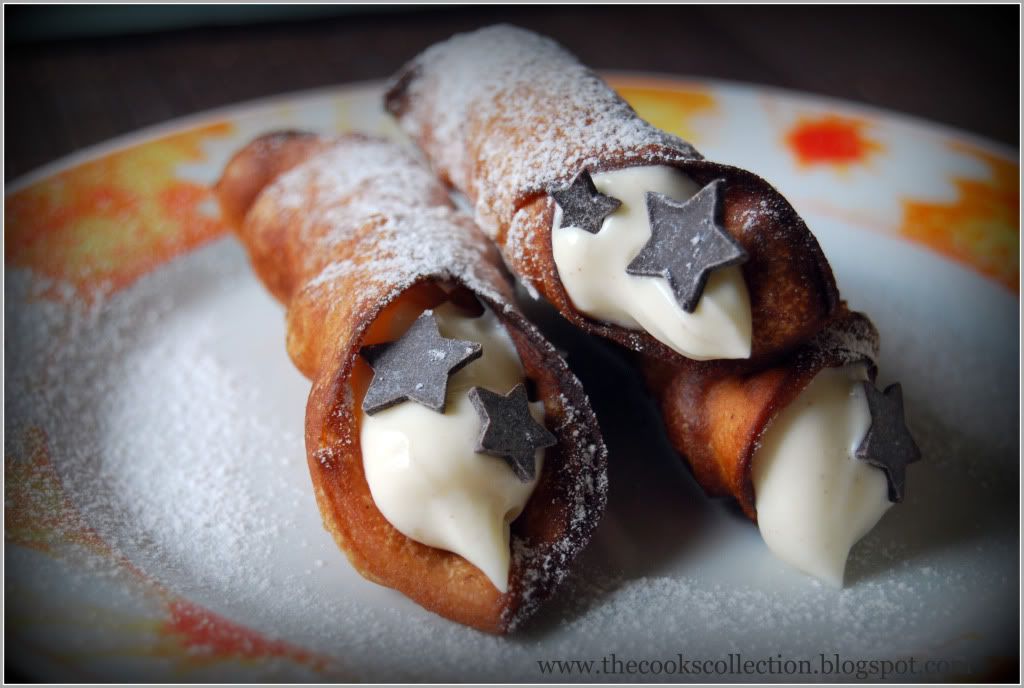
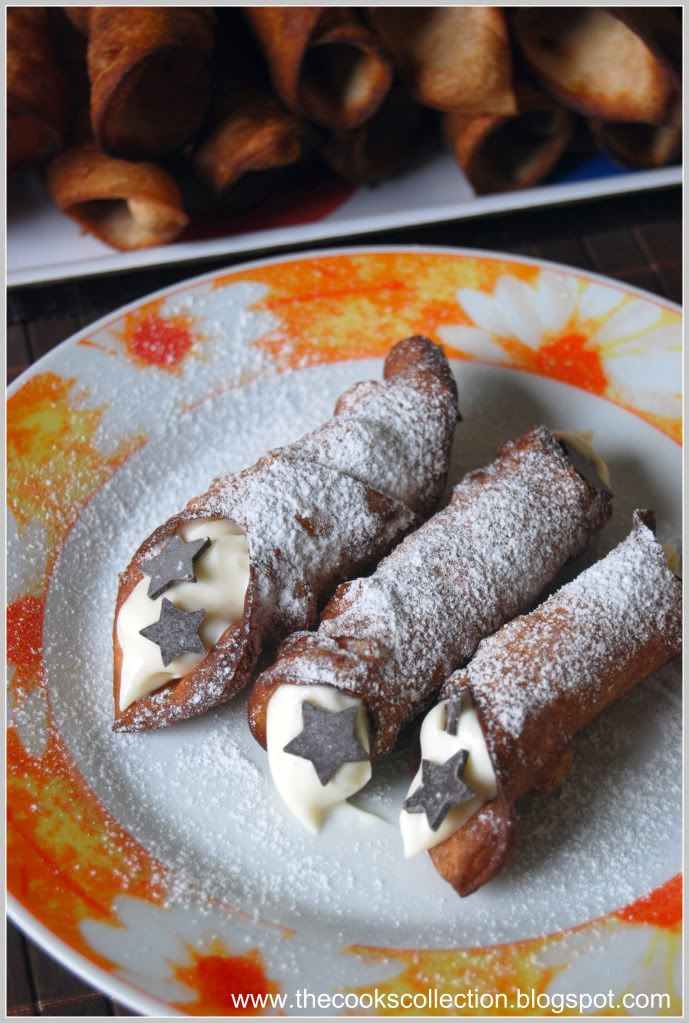
Daring Bakers: Cannoli filled with Ricotta and Mascarpone Cheese Cream
Daring Bakers November 2009 Challenge
The November 2009 Daring Bakers Challenge was chosen and hosted by Lisa Michele of Parsley, Sage, Desserts and Line Drives. She chose the Italian Pastry, Cannolo (Cannoli is plural), using the cookbooks Lidia’s Italian-American Kitchen by Lidia Matticchio Bastianich and The Sopranos Family Cookbook by Allen Rucker; recipes by Michelle Scicolone, as ingredient/direction guides. She added her own modifications/changes, so the recipe is not 100% verbatim from either book.
Cannoli are known as Italian-American pastries, although the origin of cannoli dates back to Sicily, specifically Palermo, where it was prepared during Carnevale season, and according to lore, as a symbol of fertility. The cannoli is a fried, tube-shaped pastry shell (usually containing wine) filled with a creamy amalgamation of sweetened ricotta cheese, chocolate, candied fruit or zest, and sometimes nuts. Although not traditional, mascarpone cheese is also widely used, and in fact, makes for an even creamier filling when substituted for part of the ricotta, or by itself. However, cannoli can also be filled with pastry creams, mousses, whipped cream, ice cream etc. You could also add your choice of herbs, zests or spices to the dough, if desired. Marsala is the traditional wine used in cannoli dough, but any red or white wine will work fine, as it’s not only added for flavor or color, but to relax the gluten in the dough since it can be a stiff dough to work with.
Equipment:
Cannoli forms/tubes - optional, but recommended if making traditional shaped cannoli. Dried cannelloni pasta tubes work just as well!
Deep, heavy saucepan, enough to hold at least 2-3-inches of oil or deep fryer
Deep fat frying thermometer. although the bread cube or bit of dough test will work fine.
Metal tongs
Brass or wire skimmer OR large slotted spoon
Pastry bag with large star or plain tip, but a snipped ziplock bag, butter knife or teaspoon will work fine.
Cooling rack
Paper bags or paper towels
Pastry Brush
Cheesecloth
Sieve or fine wire mesh strainer
Electric Mixer, stand or hand, optional, as mixing the filling with a spoon is fine.
Food Processor or Stand Mixer – also optional, since you can make the dough by hand, although it takes more time.
Rolling pin and/or Pasta roller/machine
Pastry or cutting board
Round cutters - The dough can also be cut into squares and rolled around the cannoli tube prior to frying. If making a stacked cannoli, any shaped cutter is fine, as well as a sharp knife.
Mixing bowl and wooden spoon if mixing filling by hand
Plastic Wrap/Clingfilm
Tea towels or just cloth towels
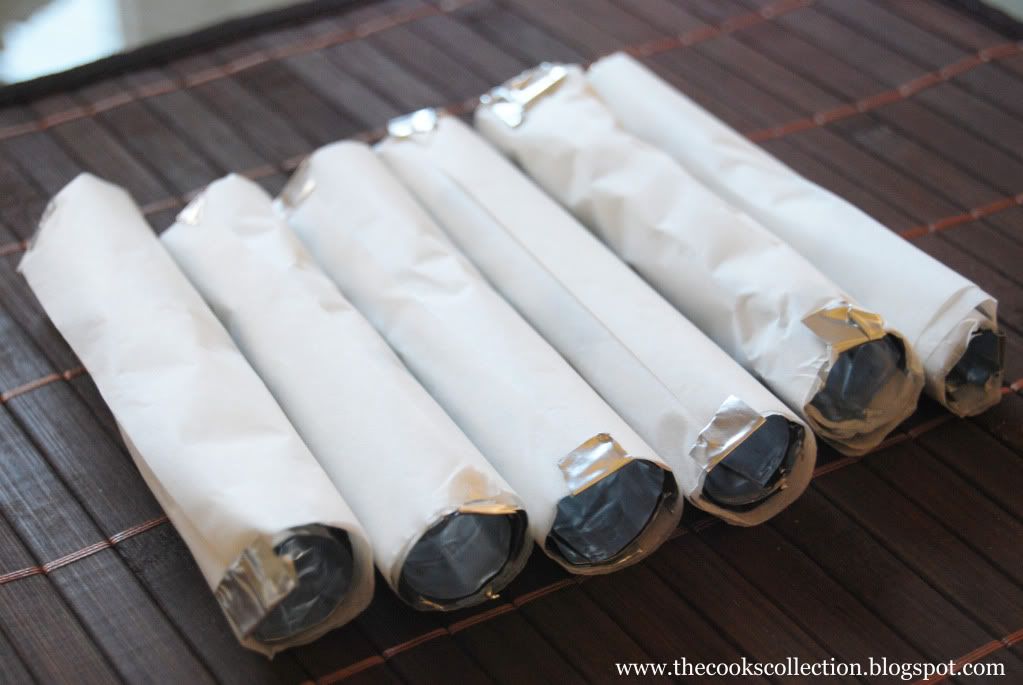
Required: If you don’t have or do not want to purchase cannoli forms, which I would never ask of any of you, you could simply cut out circles, squares, or any shapes you want and stack them with the filling of your choice to make stacked cannoli's aka Cannolipoleons (directions below). If desired, you can channel MacGuyver and fashion something heat proof to get traditional shaped cannoli (6-8 inch sawed off lengths of a wooden broom stick or cane, sanded down and oiled, is THE authentic cannoli form!), or non-traditional shapes such as creating a form to make bowls, or even using cream horns if you happen to have them. Mini cannoli would be great too, and I've provided links to retailers of cannoli forms of all sizes. I used Aluminum Foil BBQ Grill Trays for the cannoli forms. I cut them and rolled them using garlic presser and rolled them again with a sheet of parchment paper. I sealed the ends of the parchment paper using small cut outs of the grill sheet. This helps when you fry the pastry for the first time. Later the parchment paper sticks by itself and you wont need the sealing. This is a wonderful alternative for the steel cannoli forms. The fried pastry come sout easily without any problems.
Also, for those who don't like to cook or bake with alcohol - grape juice, cranberry juice, pomegranate juice, apple juice..any sweet juice of a fruit, especially ones used in or to make wine, can be substituted. Just add a little more vinegar to insure you get enough acid to relax the dough
Makes 22-24 4-inch cannoli
Prep time:
Dough – 2 hours and 10-20 minutes, including resting time, and depending on whether you do it by hand or machine.
Filling – 5-10 minutes plus chilling time (about 2 hours or more)
Frying – 1-2 minutes per cannoli
Assemble – 20–30 minutes
CANNOLI SHELLS
2 cups (250 grams/8.82 ounces) all-purpose flour
2 tablespoons(28 grams/1 ounce) sugar
1 teaspoon (5 grams/0.06 ounces) unsweetened baking cocoa powder
1/2 teaspoon (1.15 grams/0.04 ounces) ground cinnamon
1/2 teaspoon (approx. 3 grams/0.11 ounces) salt
3 tablespoons (42 grams/1.5 ounces) vegetable or olive oil
1 teaspoon (5 grams/0.18 ounces) white wine vinegar
Approximately 1/2 cup (approx. 59 grams/approx. 4 fluid ounces/approx. 125 ml) sweet Marsala or any white or red wine you have on hand
1 large egg, separated (you will need the egg white but not the yolk)
Vegetable or any neutral oil for frying – about 2 quarts (8 cups/approx. 2 litres)
1/2 cup (approx. 62 grams/2 ounces) toasted, chopped pistachio nuts, mini chocolate chips/grated chocolate and/or candied or plain zests, fruits etc.. for garnish
Confectioners' sugar
Note - If you want a chocolate cannoli dough, substitute a few tablespoons of the flour (about 25%) with a few tablespoons of dark, unsweetened cocoa powder (Dutch process) and a little more wine until you have a workable dough.
CANNOLI FILLING
2 lbs (approx. 3.5 cups/approx. 1 kg/32 ounces) ricotta cheese, drained (i used half ricotta and half mascarpone cheese)
1 2/3 cups cup (160 grams/6 ounces) confectioner’s sugar, (more or less, depending on how sweet you want it), sifted
1/2 teaspoon (1.15 grams/0.04 ounces) ground cinnamon
1 teaspoon (4 grams/0.15 ounces) pure vanilla extract or the beans from one vanilla bean
3 tablespoons (approx. 28 grams/approx. 1 ounce) finely chopped good quality chocolate of your choice
2 tablespoons (12 grams/0.42 ounces) of finely chopped, candied orange peel, or the grated zest of one small to medium orange
3 tablespoons (23 grams/0.81 ounce) toasted, finely chopped pistachios
Note - If you want chocolate ricotta filling, add a few tablespoons of dark, unsweetened cocoa powder to the above recipe, and thin it out with a few drops of warm water if too thick to pipe.
DIRECTIONS FOR SHELLS:
1. In the bowl of an electric stand mixer or food processor, combine the flour, sugar, cocoa, cinnamon, and salt. Stir in the oil, vinegar, and enough of the wine to make a soft dough. Turn the dough out onto a lightly floured surface and knead until smooth and well blended, about 2 minutes. Shape the dough into a ball. Cover with plastic wrap and let rest in the fridge from 2 hours to overnight. (I kept the dough covered with a plastic wrap in the refrigerator for 2 days and i had no problems with the pastry. It was easy to roll and had blisters on the surface.)
2 Cut the dough into two pieces. Keep the remaining dough covered while you work. Lightly flour a large cutting or pastry board and roll the dough until super thin, about 1/16 to 1/8” thick (An area of about 13 inches by 18 inches should give you that). Cut out 3 to 5-inch circles (3-inch – small/medium; 4-inch – medium/large; 5-inch;- large. Your choice). Roll the cut out circle into an oval, rolling it larger and thinner if it’s shrunk a little.
3 Oil the outside of the cannoli tubes (You only have to do this once, as the oil from the deep fry will keep them well, uhh, oiled..lol). Roll a dough oval from the long side (If square, position like a diamond, and place tube/form on the corner closest to you, then roll) around each tube/form and dab a little egg white on the dough where the edges overlap. (Avoid getting egg white on the tube, or the pastry will stick to it.) Press well to seal. Set aside to let the egg white seal dry a little.
4. In a deep heavy saucepan, pour enough oil to reach a depth of 3 inches, or if using an electric deep-fryer, follow the manufacturer's directions. Heat the oil to 375°F (190 °C) on a deep fry thermometer, or until a small piece of the dough or bread cube placed in the oil sizzles and browns in 1 minute. Have ready a tray or sheet pan lined with paper towels or paper bags.
5. Carefully lower a few of the cannoli tubes into the hot oil. Do not crowd the pan. Fry the shells until golden, about 2 minutes, turning them so that they brown evenly.
8. Lift a cannoli tube with a wire skimmer or large slotted spoon, out of the oil. Using tongs, grasp the cannoli tube at one end. Very carefully remove the cannoli tube with the open sides straight up and down so that the oil flows back into the pan. Place the tube on paper towels or bags to drain. Repeat with the remaining tubes. While they are still hot, grasp the tubes with a potholder and pull the cannoli shells off the tubes with a pair of tongs, or with your hand protected by an oven mitt or towel. Let the shells cool completely on the paper towels. Place shells on cooling rack until ready to fill.
9. Repeat making and frying the shells with the remaining dough. If you are reusing the cannoli tubes, let them cool before wrapping them in the dough.
Pasta Machine method:
1. Divide the dough into 4 equal pieces. Starting at the middle setting, run one of the pieces of dough through the rollers of a pasta machine. Lightly dust the dough with flour as needed to keep it from sticking. Pass the dough through the machine repeatedly, until you reach the highest or second highest setting. The dough should be about 4 inches wide and thin enough to see your hand through
2. Continue rolling out the remaining dough. If you do not have enough cannoli tubes for all of the dough, lay the pieces of dough on sheets of plastic wrap and keep them covered until you are ready to use them.
3, Roll, cut out and fry the cannoli shells as according to the directions above.
For stacked cannoli:
1. Heat 2-inches of oil in a saucepan or deep sauté pan, to 350-375°F (176 - 190 °C).
2. Cut out desired shapes with cutters or a sharp knife. Deep fry until golden brown and blistered on each side, about 1 – 2 minutes. Remove from oil with wire skimmer or large slotted spoon, then place on paper towels or bags until dry and grease free. If they balloon up in the hot oil, dock them lightly prior to frying. Place on cooling rack until ready to stack with filling.
DIRECTIONS FOR FILLING:
1. Line a strainer with cheesecloth. Place the ricotta in the strainer over a bowl, and cover with plastic wrap and a towel. Weight it down with a heavy can, and let the ricotta drain in the refrigerator for several hours to overnight.
2. In a bowl with electric mixer, beat ricotta until smooth and creamy. Beat in confectioner’s sugar, cinnamon, vanilla and blend until smooth. Transfer to another bowl and stir in chocolate, zest and nuts. Chill until firm.(The filling can be made up to 24 hours prior to filling the shells. Just cover and keep refrigerated).
ASSEMBLE THE CANNOLI:
1. When ready to serve..fill a pastry bag fitted with a 1/2-inch plain or star tip, or a ziplock bag, with the ricotta cream. If using a ziplock bag, cut about 1/2 inch off one corner. Insert the tip in the cannoli shell and squeeze gently until the shell is half filled. Turn the shell and fill the other side. You can also use a teaspoon to do this, although it’s messier and will take longer.
2. Press or dip cannoli in chopped pistachios, grated chocolate/mini chocolate chips, candied fruit or zest into the cream at each end. Dust with confectioner’s sugar and/or drizzles of melted chocolate if desired.
TIPS AND NOTES:
- Dough must be stiff and well kneaded
- Rolling the dough to paper thinness, using either a rolling pin or pasta machine, is very important. If the dough is not rolled thin enough, it will not blister, and good cannoli should have a blistered surface.
- Initially, this dough is VERY stubborn, but keep rolling, it eventually gives in. Before cutting the shapes, let the dough rest a bit, covered, as it tends to spring back into a smaller shapes once cut. Then again, you can also roll circles larger after they’re cut, and/or into ovals, which gives you more space for filling.
- Your basic set of round cutters usually doesn’t contain a 5-inch cutter. Try a plastic container top, bowl etc, or just roll each circle to 5 inches. There will always be something in your kitchen that’s round and 5-inches if you want large cannoli.
- Oil should be at least 3 inches deep and hot – 360°F-375°F, or you’ll end up with greasy shells. I prefer 350°F - 360°F because I felt the shells darkened too quickly at 375°F.
- If using the cannoli forms, when you drop the dough on the form into the oil, they tend to sink to the bottom, resulting in one side darkening more. Use a slotted spoon or skimmer to gently lift and roll them while frying.
- DO NOT crowd the pan. Cannoli should be fried 2-4 at a time, depending on the width of your saucepan or deep fryer. Turn them once, and lift them out gently with a slotted spoon/wire skimmer and tongs. Just use a wire strainer or slotted spoon for flat cannoli shapes.
- When the cannoli turns light brown - uniform in color, watch it closely or remove it. If it’s already a deep brown when you remove it, you might end up with a really dark or slightly burnt shell.
- Depending on how much scrap you have left after cutting out all of your cannoli shapes, you can either fry them up and sprinkle with confectioner’s sugar for a crispy treat, or let the scraps rest under plastic wrap and a towel, then re-roll and cut more cannoli shapes.
- Push forms out of cannoli very gently, being careful not to break the shells as they are very delicate. DO NOT let the cannoli cool on the form, or you may never get it off without it breaking. Try to take it off while still hot. Hold it with a cloth in the center, and push the form out with a butter knife or the back of a spoon.
- When adding the confectioner’s sugar to the filling..TASTE. You may like it sweeter than what the recipe calls for, or less sweet, so add in increments.
- Fill cannoli right before serving! If you fill them an hour or so prior, you’ll end up with soggy cannoli shells.
- If you want to prepare the shells ahead of time, store them in an airtight container, then re-crisp in a 350°F (176 °C) oven for a few minutes, before filling.
- Practice makes perfect. My first batch of shells came out less than spectacular, and that’s an understatement. As you go along, you’ll see what will make them more aesthetically pleasing, and adjust accordingly when rolling. My next several batches turned out great. Don’t give up!!


Tuesday, April 14, 2009
Sweet Ricotta Pie
This dessert uses pasta frolla, a sweet Italian pie dough for the base and lattice. The filling used here in this recipe can be made in minutes. It uses just 5 ingredients and Anisette, a licorice-flavoured liqueur, is the traditional flavouring for this type of cheese cake, but you can use anise extract or alter the flavour completely by substituting vanilla or almond extract, using brandy, or mixing in a little fruit-flavoured liqueur, such as Grand Marnier. I made a mini version of this recipe as i had to serve just 2 people. I reduced the recipe into half (reduced all the ingredients for filling by half and used just 1 large egg) and used 4 mini tart molds instead of a large one. I loved this dessert as it has a light cheese filling and a crisp cookie feel base. I freezed half the recipe of pasta frolla and will be using it for other recipes.
Recipe adapted from "Baking With Julia"
Ingredients required;
1 pound, OR 450 gms whole milk ricotta
1/3 cup sugar, ( i added a little extra for the sweetness)
1 tbsp anisette or 1 tbsp vanilla extract
3 large eggs, beaten
1/2 tsp cinnamon
1 recipe Pasta Frolla
Method;
Stir in ricotta, sugar, anisette, and eggs together in a bowl until smooth; set aside.
Position a rack in the lower third of the oven and preheat the oven to 350 deg F. Butter a 9-inch glass pie plate. (If you dont have a glass pie plate, use metal, but increase the oven temperature to 375 deg F.) (I used mini tart molds)
Working with 2/3 rd of the dough, knead it into a disc and roll it on a lightly floured work surface into a 12 inch circle. Transfer the dough to the pie plate and press it gently against the bottom and up the sides of the plate. Dont worry if the dough tears-just press it back together. Use the dull side of the knife to trim the excess dough even with the rim. Srape the filling into the pie shell, smooth the top, and dust with cinnamon.
Forming the lattice
Knead and shape the remaining piece of dough into a block and roll it on a lightly floured surface into a 9-inch square. Using a pizza or pastry cutter ( a ruffle-edged pastry wheel is nice) or a thin sharp knife, cut the dough into 12 even strips. To form the lattice top, lay 6 of the strips across the pie at 1 1/4 inch intervals, then crisscross with the remaining strips, placing them diagonally across the first strips. Trim the ends of the lattice even with the edge of the pan.
Baking the Pie
Bake for 35 to 40 minutes, or until the crust is golden and the filling is firm and slightly puffed. Transfer the pie to a rack and cool completely before serving. Storing ;
Leftovers can be kept, well covered in the refrigerator, for up to 3 days. Serve slightly chilled or at room temperature.
Pasta Frolla
Pasta frolla - pasta means "paste" or "dough" amd frolla means "tender" - is a sweet Italian pie dough. It is indeed tender, light and crumbly too, and a crust as commendable with savory fillings as with sweet such as Sweet Ricotta Pie. Its a made-in-the-food-processor dough thats's almost indestructable. And because of relatively large amount of sugar, you dont have to worry about overworking it, nor do you need to be concerned if it cracks as it goes into the pie plate - everything is fixable. Makes enough for a 9-inch lattice -topped pie
You'll need the following Ingredients...
2 cups all-purpose flour
1/3 cup sugar
1/2 tsp baking powder
1/4 tsp salt
1 stick (4 ounces) cold unsalted butter or 4 ounces cold lard, cut into 8 pieces
2 large eggs, lightly beaten
Method
Put the flour, sugar, baking powder, and salt into the work bowl of a food processor fitted with metal blade; pulse a few time just to mix the ingredients. Add the butter and pulse 15 to 20 minutes, or until the mixture resembles fine cornmeal. With the machine running, add the eggs and process until the dough forms a ball on the blade, about a minute or so. Remove the dough from the food processor and knead it, folding it over on itself, until it is smooth, 1 to 2 minutes. Wrap the dough in plastic and set aside for up to 30 minutes, or chill until needed.
Storing
The dough can be made up to 3 days ahead, wrapped well, and refrigerated, or frozen, tightly wrapped, for up to a month. Thaw , still wrapped, in the refrigerator.
Try this recipe with Sweet Ricotta Pie.
Friday, March 27, 2009
Daring Bakers - Lasagne of Emilia-Romagna (Lasagne Verdi al Forno)
The March 2009 challenge is hosted by Mary of Beans and Caviar, Melinda of Melbourne Larder and Enza of Io Da Grande. They have chosen Lasagne of Emilia-Romagna from The Splendid Table by Lynne Rossetto Kasper as the challenge.
 Lasagne is a dish that has successfully transcended borders and is today made around the world, albeit with many variations from the Italian original. Even within Italy, there are many variations and each region has its own lasagne tradition. But, as Lynne explains in her introduction to the recipe –and Enza, as our Italian expert for this dish, also agrees - the dish should always be a “vivid expression of the ‘less is more’ philosophy of cooking. Mere films of béchamel sauce and meat ragu coat the sheerest spinach pasta. Parmigiano-Reggiano cheese dusts each layer. There is nothing more; no ricotta, no piling on of meats, vegetables or cheese; little tomato, and no hot spice. Baking performs the final marriage of flavours. The results are splendid.”
(Serves 8 to 10 as a first course, 6 to 8 as a main dish)
Preparation Time: 15 minutes to assemble and 40 minutes cooking time
10 quarts (9 litres) salted water
1 recipe Spinach Pasta cut for lasagna (recipe follows)#1
1 recipe Bechamel Sauce (recipe follows)#2
1 recipe Vegetarian Bolognese Sauce
1 cup (4 ounces/125g) freshly grated Parmigiano-Reggiano
1 cup grated Mozzarella cheese (my touch)
Method
Working Ahead:
The ragu and the béchamel sauce can be made up to three days ahead. The ragu can also be frozen for up to one month. The pasta can be rolled out, cut and dried up to 24 hours before cooking. The assembled lasagne can wait at room temperature (20 degrees Celsius/68 degrees Fahrenheit) about 1 hour before baking. Do not refrigerate it before baking, as the topping of béchamel and cheese will overcook by the time the center is hot.
Assembling the Ingredients:
Have all the sauces, rewarmed gently over a medium heat, and the pasta at hand. Have a large perforated skimmer and a large bowl of cold water next to the stove. Spread a double thickness of paper towels over a large counter space. Preheat the oven to 350 degrees Fahrenheit (180 degrees Celsius). Oil or butter a 3 quart (approx 3 litre) shallow baking dish.
Cooking the Pasta:
Bring the salted water to a boil. Drop about four pieces of pasta in the water at a time. Cook about 2 minutes. If you are using dried pasta, cook about 4 minutes, taste, and cook longer if necessary. The pasta will continue cooking during baking, so make sure it is only barely tender. Lift the lasagne from the water with a skimmer, drain, and then slip into the bowl of cold water to stop cooking. When cool, lift out and dry on the paper towels. Repeat until all the pasta is cooked.
.jpg)
Assembling the Lasagne:
Spread a thin layer of béchamel over the bottom of the baking dish. Arrange a layer of about four overlapping sheets of pasta over the béchamel. Spread a thin layer of béchamel (about 3 or 4 spoonfuls) over the pasta, and then an equally thin layer of the ragu. Sprinkle with about 1&1/2 tablespoons of the béchamel and about 1/3 cup of the cheese. Repeat the layers until all ingredients are used, finishing with béchamel sauce and topping with a generous dusting of cheese.
 Baking and Serving the Lasagne:
 Cover the baking dish lightly with foil, taking care not to let it touch the top of the lasagne. Bake 40 minutes, or until almost heated through. Remove the foil and bake another 10 minutes, or until hot in the center (test by inserting a knife – if it comes out very warm, the dish is ready). Take care not to brown the cheese topping. It should be melted, creamy looking and barely tinged with a little gold. Turn off the oven, leave the door ajar and let the lasagne rest for about 10 minutes. Then serve.

This is not a solid lasagne, but a moist one that slips a bit when it is cut and served.
#1 Spinach Egg Pasta (Pasta Verde)
Preparation: 45 minutes
Makes enough for 6 to 8 first course servings or 4 to 6 main course servings, equivalent to 1 pound (450g) dried boxed pasta.

2 jumbo eggs (2 ounces/60g or more each)
10 ounces (300g) fresh spinach, rinsed dry, and finely chopped; OR 6 ounces (170g) frozen chopped spinach, defrosted and squeezed dry
3 & 1/2 cups (14 ounces/400g) all purpose unbleached (plain) flour (organic stone ground preferred)
Working by Hand:
Equipment
A roomy work surface, 24 to 30 inches deep by 30 to 36 inches (60cm to 77cm deep by 60cm to 92cm). Any smooth surface will do, but marble cools dough slightly, making it less flexible than desired.
A pastry scraper and a small wooden spoon for blending the dough.
A wooden dowel-style rolling pin. In Italy, pasta makers use one about 35 inches long and 2 inches thick (89cm long and 5cm thick). The shorter American-style pin with handles at either end can be used, but the longer it is, the easier it is to roll the pasta.
Note: although it is not traditional, Enza has successfully made pasta with a marble rolling pin, and this can be substituted for the wooden pin, if you have one.
Plastic wrap to wrap the resting dough and to cover rolled-out pasta waiting to be filled. It protects the pasta from drying out too quickly.
A sharp chef’s knife for cutting pasta sheets.
Cloth-covered chair backs, broom handles, or specially designed pasta racks found in cookware shops for draping the pasta.
Mixing the dough:
Mound the flour in the center of your work surface and make a well in the middle. Add the eggs and spinach. Use a wooden spoon to beat together the eggs and spinach. Then gradually start incorporating shallow scrapings of flour from the sides of the well into the liquid. As you work more and more flour into the liquid, the well’s sides may collapse. Use a pastry scraper to keep the liquids from running off and to incorporate the last bits of flour into the dough. Don’t worry if it looks like a hopelessly rough and messy lump.
Kneading:
With the aid of the scraper to scoop up unruly pieces, start kneading the dough. Once it becomes a cohesive mass, use the scraper to remove any bits of hard flour on the work surface – these will make the dough lumpy. Knead the dough for about 3 minutes. Its consistency should be elastic and a little sticky. If it is too sticky to move easily, knead in a few more tablespoons of flour. Continue kneading about 10 minutes, or until the dough has become satiny, smooth, and very elastic. It will feel alive under your hands. Do not shortcut this step. Wrap the dough in plastic wrap, and let it relax at room temperature 30 minutes to 3 hours.
Stretching and Thinning:
If using an extra-long rolling pin work with half the dough at a time. With a regular-length rolling pin, roll out a quarter of the dough at a time and keep the rest of the dough wrapped. Lightly sprinkle a large work surface with flour. The idea is to stretch the dough rather than press down and push it. Shape it into a ball and begin rolling out to form a circle, frequently turning the disc of dough a quarter turn. As it thins outs, start rolling the disc back on the pin a quarter of the way toward the center and stretching it gently sideways by running the palms of your hands over the rolled-up dough from the center of the pin outward. Unroll, turn the disc a quarter turn, and repeat. Do twice more.
Stretch and even out the center of the disc by rolling the dough a quarter of the way back on the pin. Then gently push the rolling pin away from you with one hand while holding the sheet in place on the work surface with the other hand. Repeat three more times, turning the dough a quarter turn each time.
Repeat the two processes as the disc becomes larger and thinner. The goal is a sheet of even thickness. For lasagne, the sheet should be so thin that you can clearly see your hand through it and see colours. Cut into rectangles about 4 by 8 inches (10 x 20 cm). Note: Enza says that transparency is a crucial element of lasagne pasta and the dough should be rolled as thinly as possible. She says this is why her housekeeper has such strong arms!
Dry the pasta at room temperature and store in a sealed container or bag.
#2 Bechamel Sauce

Preparation Time: 15 minutes
4 tbsp (2 ounces/60g) unsalted butter
4 tbsp (2 ounces/60g) all purpose unbleached (plain) flour, organic stone ground preferred
2 & 2/3 cups (approx 570ml) milk
Salt and freshly ground pepper to taste
Freshly grated nutmeg to taste
Method:
Using a medium-sized saucepan, melt the butter over low to medium heat. Sift over the flour, whisk until smooth, and then stir (without stopping) for about 3 minutes. Whisk in the milk a little at a time and keep the mixture smooth. Bring to a slow simmer, and stir 3 to 4 minutes, or until the sauce thickens. Cook, stirring, for about 5 minutes, until the sauce thickens. Season with salt, pepper, and a hint of nutmeg.
Friday, March 20, 2009
Vegetarian Spaghetti Bolognese Sauce
Bolognese sauce, one of the best loved Italian pasta sauces, is traditionally made with ground meat, tomatoes and seasoning but here's a satisfying vegetarian bolognese tomato sauce that will add a hearty, wholegrain flavor to any pasta or lasagna dish. Its a vegetarian version and is loaded with vegetables and nutrition. Use the sauce to top freshly cooked spaghetti and you'll love it.
Ingredients Required;
3 tbsp Olive oil
3 cloves of Garlic, finally chopped
1 Onion, chopped
1 Red Capsicum(Bell pepper), chopped
1 Carrot, grated
1 Zucchini, chopped with skin
300 gm Mushrooms, canned or fresh
800 gms chopped canned tomatoes
2 Bayleaves
1 tbsp Chilli powder
1 tsp Light soy sauce
1 tsp Oregano
2 tsp Basil
5 tbsp thick tomato paste
1 cup Soya chunks, blended into powder
Salt to taste
Method:
First, before you start, take the powdered soya in a small saucepan. Add hot boiled water till the powder is completely immersed. Add a tsp of olive oil and set aside.
Heat 3 tbsps of olive oil in a large pan. Fry garlic for about half a minute and then add onions. Fry till the onions turn translucent. Add all the vegetables, capsicum, carrot, zucchini, mushrooms and tomatoes. fry for 2 to 3 minutes.
Then stir in the bay leaves and cilli powder. Keep it on low to medium heat.
Add the rest of the ingredients, the prepared soya along with the water, tomato paste, soy sauce, oregano, basil and salt to taste.
Simmer and cook till all the vegetables are soft and done and the sauce has reduced to the required thick consistency.
Vegetarian Bolognese Sauce is ready. Serve pasta with large ladlefuls of sauce and sprinkle generously with grated parmesan or cheddar cheese. Enjoy! Storage;
Can be kept for 3 days covered and refrigerated. It also freezes well for up to 1 month.


