
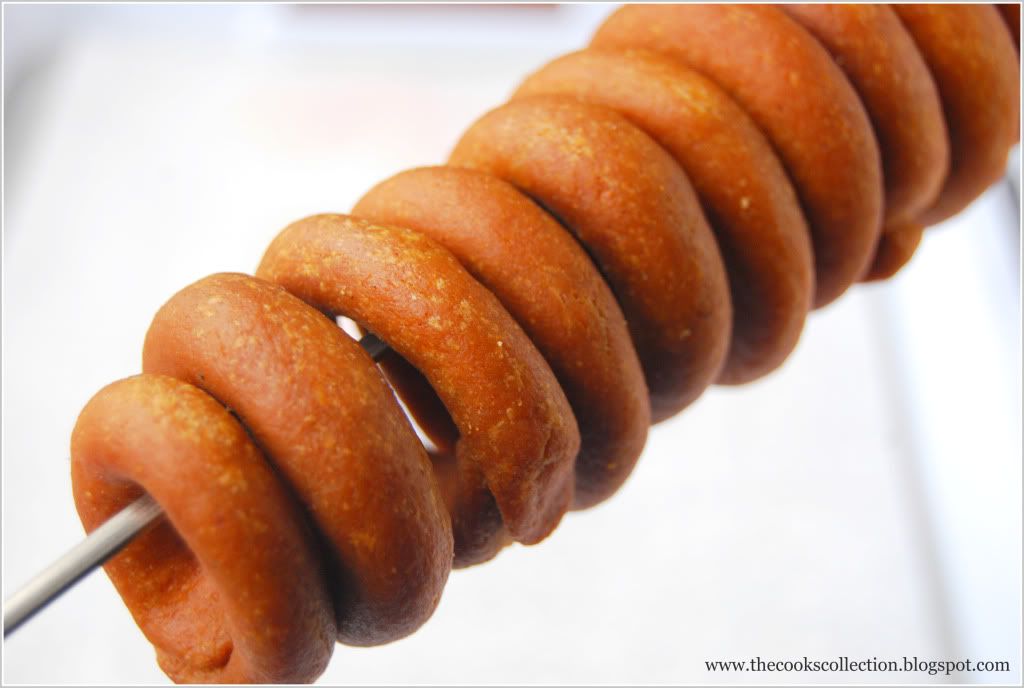
Kodubale is one of the popular snacks in South India. "KODU" means Horn (like that of a cow) and "BALE" means Bangle. These are named based on their shape. These kodubales are crunchy, hot and tasty. This recipe is slightly different from most of the other kodubale recipes, as i use fine semolina here instead of rice flour which is most commonly used. I suggest you use the finest quality of semolina here. They give a wonderful taste and the initial stage where you grind the coconut, dalia, carom and cumin seeds itself will give you the aroma of the final product.
Ingredients:
2 cups fine semolina
1/4 cup desiccated coconut or dry coconut, grated
1/4 cup kadale or Dalia
1/4 tsp asafoetida or hing
1/2 tsp salt
1/4 tsp carom seeds
1/4 tsp jeera
2 1/2 tbsps chilli powder (can reduce according to your preference)
1/4 cup hot oil + oil for deep frying (preferably sunflower oil)
Directions:
Grind together the coconut, dalia, asafoetida, carom seeds and jeera to form a smooth powder.
Combine the ground powder, fine semolina and hot oil and mix well. Add chilli
powder, salt and combine well. Now add enough water to make a soft dough.
Take about a teaspoon of the dough and roll it on a wooden board with your fingers to form a thin long cylinder, about 4 inches long and thickness of about your little finger. Slowly turn around both the ends together and join them to form a circle (like a bangle) with your thumb and fore finger. Do the same with the remaining dough.
Heat oil on a low to medium heat. Do not over heat the oil or the kodubales would turn raw from inside. Deep fry these roundels of dough. You can add 5 to 10 roundels together depending on the pan you are using. Fry them for 5 to 10 minutes each batch till they turn slightly reddish brown.
Let them cool to take a bite to see if the the kodbales have fried well and they are crispy from in to out.
Enjoy these spicy, crunchy kodbales as an evening snack with a hot cup of coffee.
Tuesday, February 8, 2011
Kodbale - Spicy Carom Flavored Rings

Thursday, January 27, 2011
Daring Bakers : Biscuit Joconde Imprime/Entremet
The January 2011 Daring Bakers’ challenge was hosted by Astheroshe of the blog accro. She chose to challenge everyone to make a Biscuit Joconde Imprime to wrap around an Entremets dessert.


Joconde imprime /entremets. A joconde imprime (French Baking term) is a decorative design baked into a light sponge cake providing an elegant finish to desserts/torts/entremets/ formed in ring molds. A joconde batter is used because it bakes into a moist, flexible cake. The cake batter may be tinted or marbleized for a further decorative effect.

This Joconde/spongecake requires attentive baking so that it remains flexible to easily conform to the molds. If under baked it will stick to the baking mat. It over baked it will dry out and crack. Once cooled, the sponge may be cut into strips to line any shape ring mold.

Equipment required:
Silpat or a silicon baking mat
½ baking sheets or a 13” x 18” jelly roll sheet (rimmed baking sheet)
Mixer (optional)
Bowls
Knives
Offset spatula
Regular spatula
Pastry comb (optional)
Rulers
Spring form pan
Biscuit cutter (or ring mold, or cut PVC pipe, or whatever else you can think of to use as a mold for individual desserts)
Torte/entremets mold/Springform pan/ Trifle dish (for larger desserts)
Cling wrap
Parchment paper
Gel, paste or liquid food coloring (optional)
Joconde Sponge
YIELD: Two ½ size sheet pans or a 13” x 18” (33 x 46 cm) jelly roll pan
Ingredients:
¾ cup/ 180 ml/ 3oz/ 85g almond flour/meal - *You can also use hazelnut flour, just omit the butter
½ cup plus 2 tablespoons/ 150 ml/ 2⅔ oz/ 75g confectioners' (icing) sugar
¼ cup/ 60 ml/ 1 oz/ 25g cake flour *See note below
3 large eggs - about 5⅓ oz/ 150g
3 large egg whites - about 3 oz/ 90g
2½ teaspoons/ 12½ ml/ ⅓ oz/ 10g white granulated sugar or superfine (caster) sugar
2 tablespoons/ 30 ml/ 1oz / 30g unsalted butter, melted
*Note: How to make cake flour: http://www.joythebaker.com/blog/2009/09/how-to-make-cake-flour/
Directions:
1. In a clean mixing bowl whip the egg whites and white granulated sugar to firm, glossy peeks. Reserve in a separate clean bowl to use later.
2. Sift almond flour, confectioner’s sugar, cake flour. (This can be done into your dirty egg white bowl)
3. On medium speed, add the eggs a little at a time. Mix well after each addition. Mix until smooth and light. (If using a stand mixer use blade attachment. If hand held a whisk attachment is fine, or by hand. )
4. Fold in one third reserved whipped egg whites to almond mixture to lighten the batter. Fold in remaining whipped egg whites. Do not over mix.
5. Fold in melted butter.
6. Reserve batter to be used later.
Patterned Joconde-Décor Paste
YIELD: Two ½ size sheet pans or a 13” x 18” (33 x 46 cm) jelly roll pan
Ingredients
14 tablespoons/ 210ml/ 7oz/ 200g unsalted butter, softened
1½ cups plus1½ tablespoons/ 385ml/ 7oz/ 200g Confectioners' (icing) sugar
7 large egg whites - about 7 oz / 200g
1¾ cup/ 420ml/ 7¾ oz/ 220g cake flour
Food coloring gel, paste or liquid
COCOA Décor Paste Variation: Reduce cake flour to 6 oz / 170g. Add 2 oz/ 60 g cocoa powder. Sift the flour and cocoa powder together before adding to creamed mixture.
Directions:
1. Cream butter and sugar until light and fluffy (use stand mixer with blade, hand held mixer, or by hand)
2. Gradually add egg whites. Beat continuously.
3. Fold in sifted flour.
4. Tint batter with coloring to desired color, if not making cocoa variation.
Preparing the Joconde- How to make the pattern:
1. Spread a thin even layer of décor paste approximately 1/4 inch (5 millimeter) thick onto silicone baking mat with a spatula, or flat knife. Place mat on an upside down baking sheet. The upside down sheet makes spreading easier with no lip from the pan.
2. Pattern the décor paste – Here is where you can be creative. Make horizontal /vertical lines (you can use a knife, spatula, cake/pastry comb). Squiggles with your fingers, zig zags, wood grains. Be creative whatever you have at home to make a design can be used. OR use a piping bag. Pipe letters, or polka dots, or a piped design. If you do not have a piping bag. Fill a ziplock bag and snip off corner for a homemade version of one.
3. Slide the baking sheet with paste into the freezer. Freeze hard. Approx 15 minutes.
4. Remove from freezer. Quickly pour the Joconde batter over the design. Spread evenly to completely cover the pattern of the Décor paste.
5. Bake at 475ºF /250ºC until the joconde bounces back when slightly pressed, approx. 15 minutes. You can bake it as is on the upside down pan. Yes, it is a very quick bake, so watch carefully.
6. Cool. Do not leave too long, or you will have difficulty removing it from mat.
7. Flip cooled cake on to a powdered sugared parchment paper. Remove silpat. Cake should be right side up, and pattern showing! (The powdered sugar helps the cake from sticking when cutting.)
Preparing the Jaconde for Molding:
Video: MUST WATCH THIS. This is a very good demo of the joconde and filling the entremets:
http://www.youtube.com/watch?v=ca4eLDok-4Q
1. Trim the cake of any dark crispy edges. You should have a nice rectangle shape.
2. Decide how thick you want your “Joconde wrapper”. Traditionally, it is ½ the height of your mold. This is done so more layers of the plated dessert can be shown. However, you can make it the full height.
3. Once your height is measured, then you can cut the cake into equal strips, of height and length. (Use a very sharp paring knife and ruler.)
4. Make sure your strips are cut cleanly and ends are cut perfectly straight. Press the cake strips inside of the mold, decorative side facing out. Once wrapped inside the mold, overlap your ends slightly. You want your Joconde to fit very tightly pressed up to the sides of the mold. Then gently push and press the ends to meet together to make a seamless cake. The cake is very flexible so you can push it into place. You can use more than one piece to “wrap “your mold, if one cut piece is not long enough.
5. The mold is done, and ready to fill.
*Note: If not ready to use. Lay cake kept whole or already cut into strips, on a flat surface, wrap in parchment and several layers of cling wrap and freeze.
Entremet- Filling
It is nice to have a completed dessert so you can unmold and see the Joconde working. Fill with anything you desire. Layers of different flavors and textures! However, it needs to be something cold that will not fall apart when unmolded.
Half of my Cake was filled with French Pastry Cream and another half with Strawberry Mousse.
French Pastry Cream
Ingredients:
350ml milk
17 gm / 1 tsp sugar, for the milk
27 gm corn starch
70 gm sugar
55 gm egg yolk
35 gm butter
250 gm freshly whipped cream
6 gm agar agar or gelatin
Method:
1. Boil the milk and sugar in a saucepan.
2. Next in a bowl mix the yolks, corn starch and sugar ill it becomes white.
3. Then pour half the boiling milk into the bowl and mix well. Now pour this into the saucepan and heat until it thickens.
4. Take the pan off the heat and add butter.
5. Mix agar agar into the above mixture.
6. Cool the mixture and mix with the whipped cream and fill into the round shaped prepared biscuit.
Suggestions:
Mousses, pastry creams, Bavarian creams, cheesecakes, puddings, curds, jams, cookie bases, more cake (bake off the remaining sponge and cut to layer inside), nuts, Dacquoise, fresh fruit, chocolates, gelee.
Sunday, January 16, 2011
Tapioca Pudding ( Sabakki Paayasam)
Sabakki Paayasam is basically a Kheer or Pudding made out of tapioca pearls or sago. This dessert is perfect finish for any meal. It has a lovely creamy texture flavored with cardamom and saffron and crushed almonds to give a wonderful crunch feel.. Its been one of my favorite childhood dessert!

1/4 cup Sabakki or Tapioca pearls
1/2 tin Sweetened Condensed milk
1/4 tsp Cardamom powder
pinch of saffron
A handful of crushed Almonds
Directions:
In a large pan, fry Tapioca pearls with a teaspoon of ghee( thats optional, its just to give a little aroma) for about 2 minutes on high flame, just to warm it up a little bit.
Pour about 300ml of water and cook on medium to high flame with constant stirring every couple of minutes. Keep adding water if the water gets dried up. It'll take about 15 to 20 minutes. Be patient and make sure the entire pearl gets transparent. See that the white part of the pearls disappears. Thats when the tapioca is cooked.
Now add the Sweetened condensed milk along with saffron and cardamom powder and let it come to a boil. You can add a little milk to get the right consistency. And you can even substitute sugar for condensed milk and add more milk instead.
After it has reached the right consistency, take it off the heat and let it cool a little bit.
Serve warm ,cold, or chilled topped with crushed almonds.
Enjoy!
Monday, September 27, 2010
Daring Bakers Challenge - Sugar Cookies

The September 2010 Daring Bakers’ challenge was hosted by Mandy of “What the Fruitcake?!” Mandy challenged everyone to make Decorated Sugar Cookies based on recipes from Peggy Porschen and The Joy of Baking.

Preparation Time
30 minutes: Making dough & rolling
1 hour min: Refrigeration
8-15 minutes: Baking per tray depending on size of cookies
Equipment Required
- Parchment paper
- Rolling pin
- 5mm guide sticks (optional)
- Cookie cutters or sharp knife
- Baking trays
- Wire cooling rack
- Spatulas
- Mixing bowls
- Measuring cups/spoons or weighing scale
- Sieve
- Icing bags / Parchment Cones
- Sizes 1 to 5 plain icing tips (2 and 4 being the most common to use)
- Star icing tips (optional)
- Couplers (optional)
- Toothpicks
- Elastic bands
Basic Sugar Cookies:
Makes Approximately 36x 10cm / 4" Cookies
200g / 7oz / ½ cup + 6 Tbsp Unsalted Butter, at room temperature
400g / 14oz / 3 cups + 3 Tbsp All Purpose / Plain Flour
200g / 7oz / 1 cup Caster Sugar / Superfine Sugar
1 Large Egg, lightly beaten
5ml / 1 tsp Vanilla Extract / Or seeds from 1 vanilla bean
Directions
• Cream together the butter, sugar and any flavourings you’re using. Beat until just becoming
creamy in texture.
• Tip: Don’t over mix otherwise you’ll incorporate too much air and the cookies will spread during
baking, losing their shape.
• Beat in the egg until well combined, make sure to scrape down the sides of the bowl.
Add the sifted flour and mix on low until a non sticky dough forms.
• Knead into a ball and divide into 2 or 3 pieces.
• Roll out each portion between parchment paper to a thickness of about 5mm/1/5 inch (0.2 inch)
• Refrigerate for a minimum of 30mins.
• Tip: Recipes commonly just wrap the whole ball of dough in clingwrap and then refrigerate it for an
hour or overnight, but by rolling the dough between parchment, this shortens the chilling time and
then it’s also been rolled out while still soft making it easier and quicker.
• Once chilled, peel off parchment and place dough on a lightly floured surface.
• Cut out shapes with cookie cutters or a sharp knife.
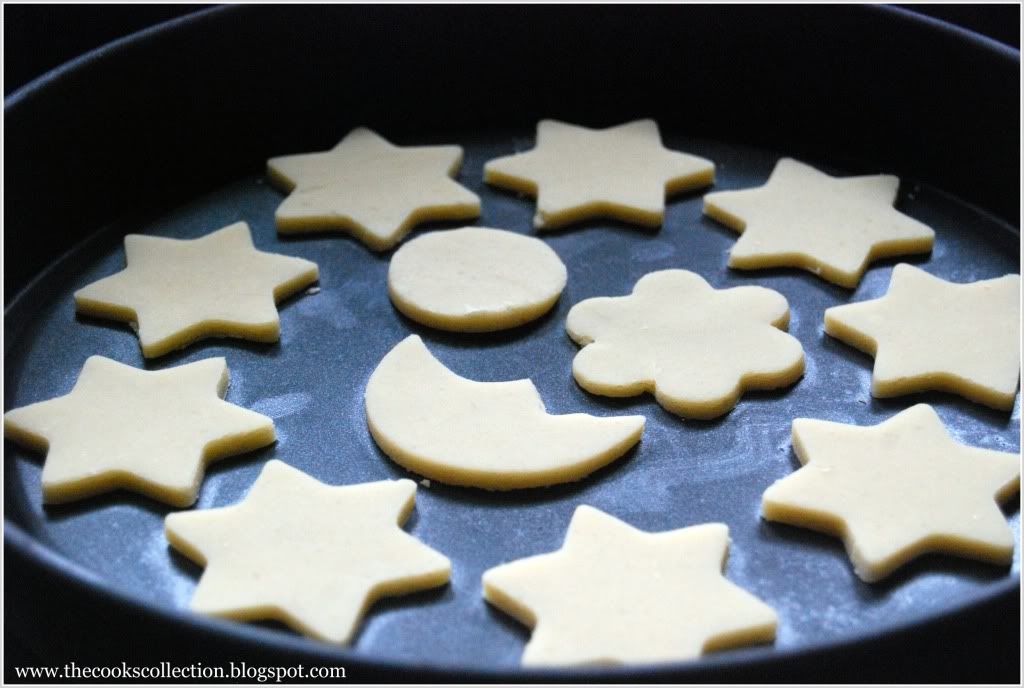
• Tip: It’s very important you chill them again otherwise they’ll spread while baking.
• Re-roll scraps and follow the above process until all scraps are used up.
• Preheat oven to 180°C (160°C Fan Assisted) / 350°F / Gas Mark 4.
• Bake until golden around the edges, about 8-15mins depending on the size of the cookies.(I baked in a convection oven for 15 minutes on a non-stick baking pan)

some cookies being baked before others are done.
• Tip: Rotate baking sheets half way through baking if your oven bakes unevenly.
• Leave to cool on cooling racks.
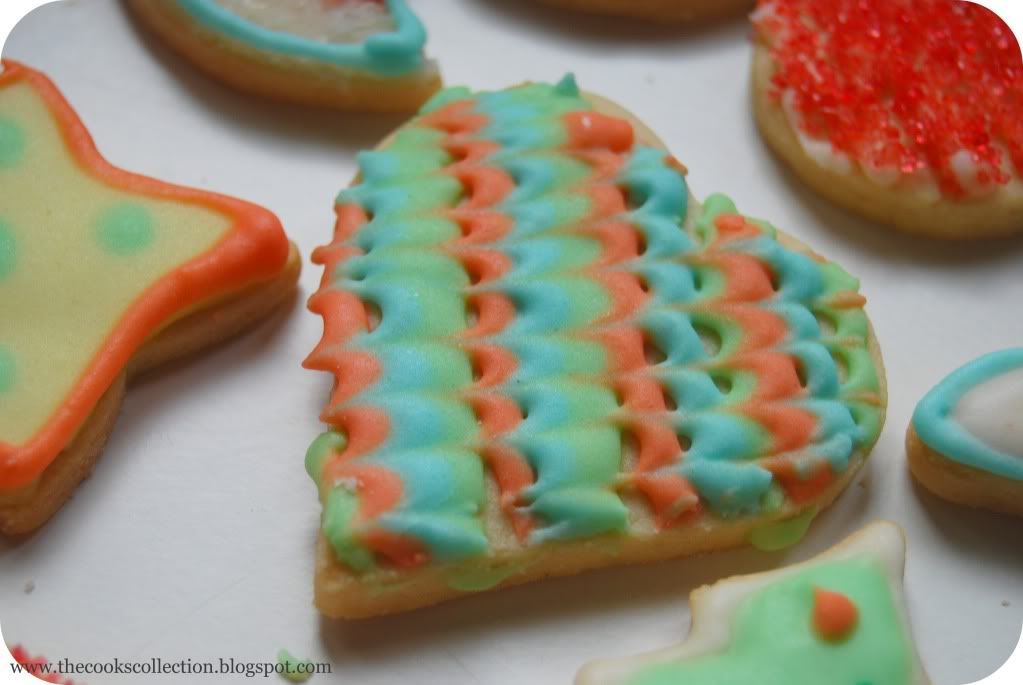
• Once completely cooled, decorate as desired.
• Tip: If wrapped in tinfoil/cling wrap or kept in airtight containers in a cool place, un-decorated
cookies can last up to a month.
Royal Icing:
315g – 375g / 11oz – 13oz / 2½ - 3 cups Icing / Confectioner’s / Powdered Sugar, unsifted
2 Large Egg Whites
10ml / 2 tsp Lemon Juice
5ml / 1 tsp Almond Extract, optional
Directions:
• Beat egg whites with lemon juice until combined.
• Tip: It’s important that the bowls/spoons/spatulas and beaters you use are thoroughly cleaned and
grease free.
• Sift the icing sugar to remove lumps and add it to the egg whites.
• Tip: There are 2 amounts of icing sugar listed, the lesser amount is good for a flooding consistency, and the larger amount is for outlining, but you can add even more for a much thicker consistency good for writing. If you add too much icing sugar or would like to make a thinner consistency, add very small amounts of water, a few drops at a time, until you reach the consistency you need.
• Beat on low until combined and smooth.
• Use immediately or keep in an airtight container.
• Tip: Royal Icing starts to harden as soon as it’s in contact with air so make sure to cover containers with plastic wrap while not in use.
General Baking Tips
• When measuring by volume (cup) always shift/aerate your flour/icing sugar in the container/bag before measuring because it settles as it sits and so you end up with more flour/icing sugar in your cup. I do this by moving the ingredient around with a spoon, whisk or fork.
• When measuring flour or icing sugar by volume (cup) never scoop the flour/icing sugar up with the cup otherwise you compress the contents and this can make a big difference in the amount you’re using. Rather, spoon the ingredient into the cup until level with the top.
• When measuring baking powder or baking soda, always level off the top of the measuring spoon with something flat (like the back of a knife) as these ingredients need to be accurately measured.
• When mixing your ingredients, always follow the recipe instructions, especially when it comes to beating in eggs and flour, so if it specifies to mix until just combined or to beat for 4 minutes, follow the instructions to get best results.
• Unless otherwise specified, always have your ingredients at room temperature.
• It’s always best to invest in an oven thermometer so that you know exactly the temperature you’re baking at then you can also find out if you have cold or hot spots in your oven.
• If you need to rotate your trays midst baking, always allow at least half the baking time to lapse before opening your oven to move baking trays around, this allows time for your baked goods to form a good structure so that they won’t flop.
General Royal Icing Tips
• Keep a damp cloth handy while decorating your cookies so that if you’re switching between different icing bags, you can keep the tips covered with the damp cloth so that the icing doesn’t dry and clog them.
• If your icing tips do clog, use a toothpick or pin to unclog them.
• Always pipe a little bit of royal icing onto a board/paper towel before you begin to make sure there are no air bubbles.
• Remember to always cover bowls containing royal icing wither cling wrap, a damp cloth or sealable lid so that the surface doesn’t dry.
• Don’t store anything decorated with royal icing in the fridge otherwise the royal icing will
become tacky.
VERDICT:
1.The cookies tasted great as it is without the icing. With icing, i felt the cookies tasted more sweet.
2. As a whole, it was a lovely challenge. My daughter (3 years old) assisted me in making the cookies and decorating it. It was a lovely experience.
3. I will surely be making it again.
Sunday, September 19, 2010
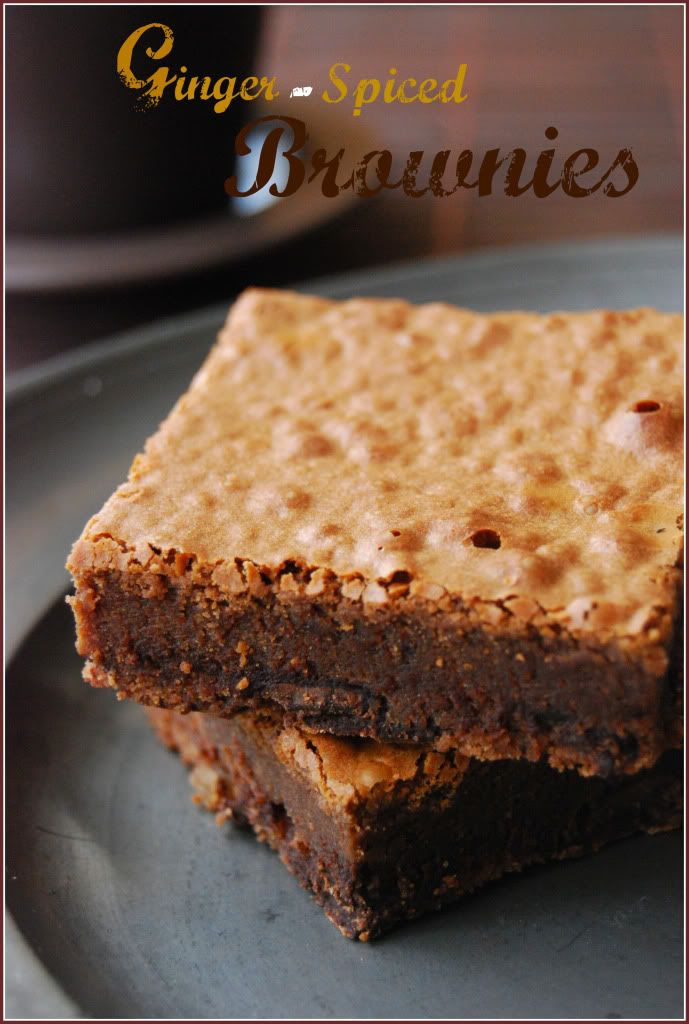
Ginger Spiced Brownies
This is one of the best homemade brownies i have ever had. Ginger with chocolate is a delicious taste sensation. Here good bittersweet chocolate flavored with pieces of candied ginger is used in a chocolate brownie mixture. Just a hint of spice, plus deliciously tangy soured cream, makes these brownies extra special. The texture of this brownie is dense, fudgy and moist. You just cant stop for one!! Now go-ahead and make them yourself..
Makes 20
Ingredients:
200 g, 7 oz. good milk chocolate
100 g, 7 tablespoons butter
4 eggs
1 cup sugar, granulated or superfine
3/4 cup all-purpose flour
1/4 teaspoon ground cinnamon
1/2 teaspoon ground ginger
3 tablespoons soured cream *can substitute with full fat yogurt
50 g bittersweet chocolate with candied ginger pieces, chopped (if you cant find them, just add 30 g of choc and 20 g of candied ginger ,separately chopped)
a brownie pan, 8 x 10 inches, greased and base lined
Directions:
Preheat the oven to 350 deg F. Break up the 7 oz milk chocolate and put it in a heatproof mixing bowl with butter. Set the bowl over a saucepan of steaming water and melt gently, stirring frequently. Remove the bowl from the saucepan and leave to cool until needed.
Put the eggs and sugar into the bowl of an electric mixer or a hand mixer until very thick and mousse-like. Whisk in the melted chocolate mixture.
Sift the flour and spices into the bowl and stir in. Mix in the soured cream followed by the chopped chocolate with ginger. Transfer to the prepared pan and spread evenly.
Bake in a preheat oven for about 25 minutes or until a skewer inserted halfway between the sides and the center comes out just clean. Remove the pan from the oven.
Leave to cool before carefully removing from the pan and cutting into pieces. Store in an airtight container and eat within 5 days.
Saturday, September 11, 2010
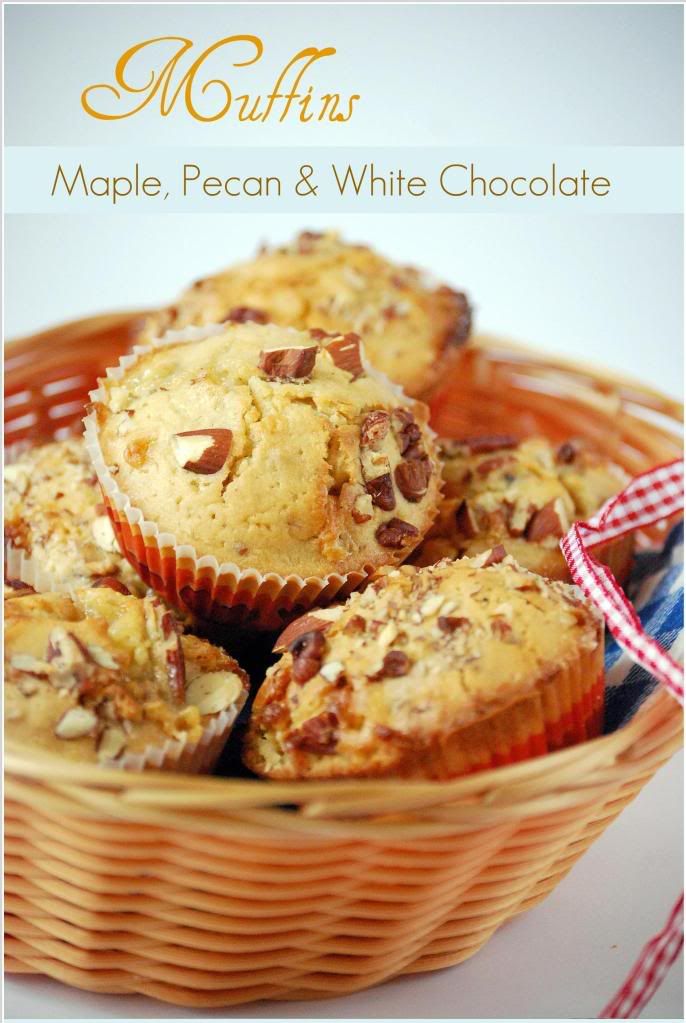
Maple, Pecan & White Chocolate Muffins
Maple syrup adds a lovely caramel flavor to these muffins. These muffins have a soft crumb and goes well with the crunchiness of the pecans and the feel of the soft sweet touch of white chocolate.
Makes 12 muffins
Ingredients:
300 g (10 oz) self-raising flour
1 teaspoon baking powder
125 g (4 oz) soft brown sugar
1 egg
50 ml (2 fl oz ) maple syrup
250 ml (8 fl oz) milk
5o g (2 oz) unsalted butter, melted
125 g (14 oz) white chocolate, chopped or white chocolate chips
75 g (3 oz) pecan nuts, coarsely chopped
to decorate
chopped pecans
chopped white chocolate
Method:
Sift the flour and baking powder into a bowl and stir in the sugar.
Beat together the egg, syrup, milk and melted butter and beat into the dry ingredients until mixed. do not over mix.
Fold in the chocolate and pecan nuts.
Line 12 holes of a muffin tray with paper cases. Divide the mixture among the paper cases and top with some extra chopped nuts and chocolate.
Bake in a preheated oven 200 deg C(400 deg F), Gas Mark 6, for 20 - 25 minutes until risen and golden. Leave to cool on a wire rack.
Wednesday, August 11, 2010
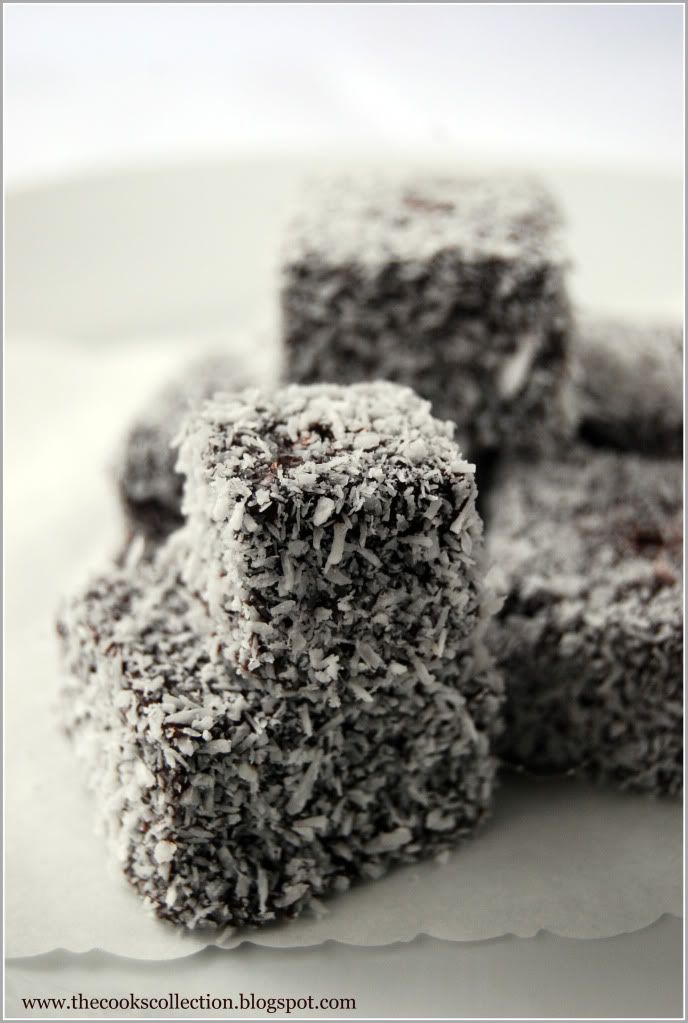
Lamingtons
Lamingtons are to Australians what the chocolate brownie is to Americans. These are basically cubes of sponge cake coated in chocolate icing and then rolled in desiccated coconut to finish.
Makes 24 small cakes
Ingredients:
For cake:
125 g unsalted butter, softened
125 g caster sugar
2 eggs, lightly beaten
250 g self raising flour, sifted
pinch of salt
1/2 cup or 8 tablespoons milk
1 teaspoon vanilla extract
For icing:
200 g icing sugar
50 g cocoa powder
75 -100 ml boiling water
100 g desiccated coconut
Method:
Make the cake: Put all the cake ingredients in a food processor and process until smooth. Or if you are making the cake batter by hand, beat the butter and sugar together until pale and light. Then beat in the eggs, a little at a time, until incorporated. Sift in the flour and salt and fold into the creamed mixture with milk and vanilla.
Oil and base-line a 18 x 25 cm (7 x 10 inch) cake tin and transfer the mixture to the prepared tin. Smooth the surface with a palette knife and bake in a preheated oven, 190 degrees C (375 degrees F) for 25 -30 minutes until risen and firm to touch. Leave to cool in the tin for 5 minutes and then turn out on a wire rack to cool. Leave out overnight.
Make the icing: Sift the icing sugar and cocoa powder into a bowl. Male a well in the center and beat in the boiling water to make a smooth icing with a pouring consistency.
How to proceed: Cut the cooled cake into 24 squares. Use 2 forks or a big skewer to dip each cake into the icing and then immediately coat with the coconut. Leave to set on a baking paper.
Enjoy!!


Wednesday, July 14, 2010
Frozen Apple Yogurt
This delicious dessert is simple and perfect not only for the heating summer But for the winter too. I loved the flavor of apple with the curd cheese. This recipe is definitely a keeper.
Ingredients:
500ml yogurt mass(recipe below)
125 gms sugar
1 big apple, pureed
1 tsp vanilla extract
3 egg whites
Directions:
For the yogurt mass, put 1 kg skimmed milk yogurt into a strainer which has been lined with a thin cheese cloth. Put the transparent film on top, weigh down with a plate, and allow to drip off at least for 6 hours or overnight. The yogurt should now have a consistency of firm curd cheese or cream cheese.
Mix yogurt mass, sugar, pureed apple and vanilla well.
Beat the egg white until stiff and mix carefully with the yogurt mass. Fill the mass into the bowl of an ice cream maker and run the machine for approx. 30-40 minutes.
Note:
If you do not have an ice-cream maker, then after the mixture has been in the refrigerator overnight, pour into a deep plastic vessel and place in the freezer. After 30 - 45 minutes take out and whisk with an electric hand mixer. Place back into the freezer. Repeat this process several times - 3 to 4 - then allow to freeze until firm.

Tuesday, June 8, 2010
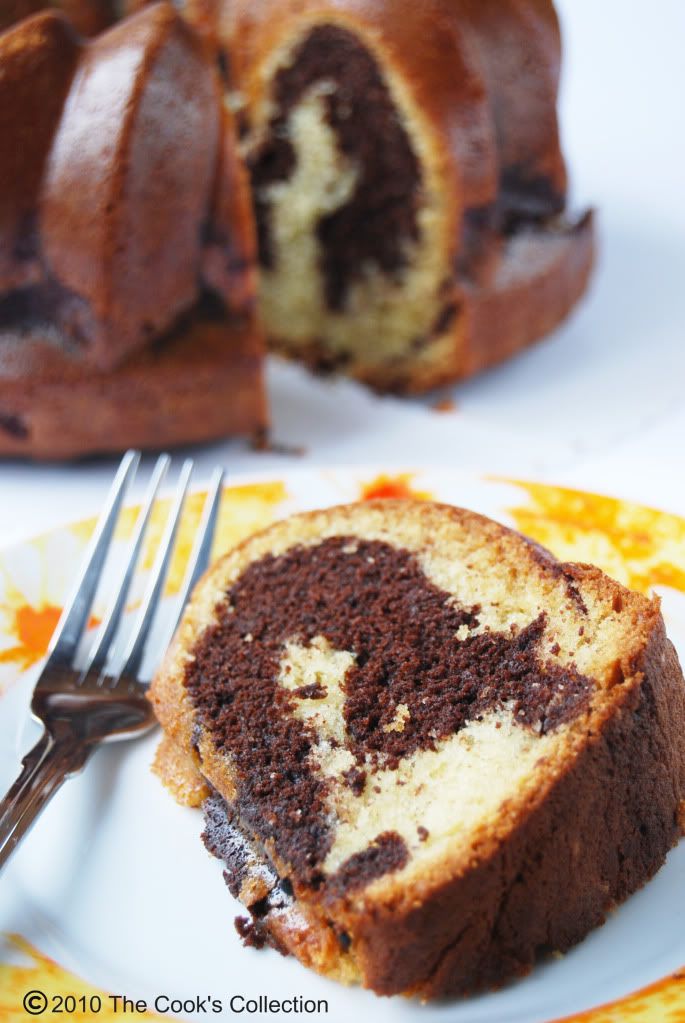
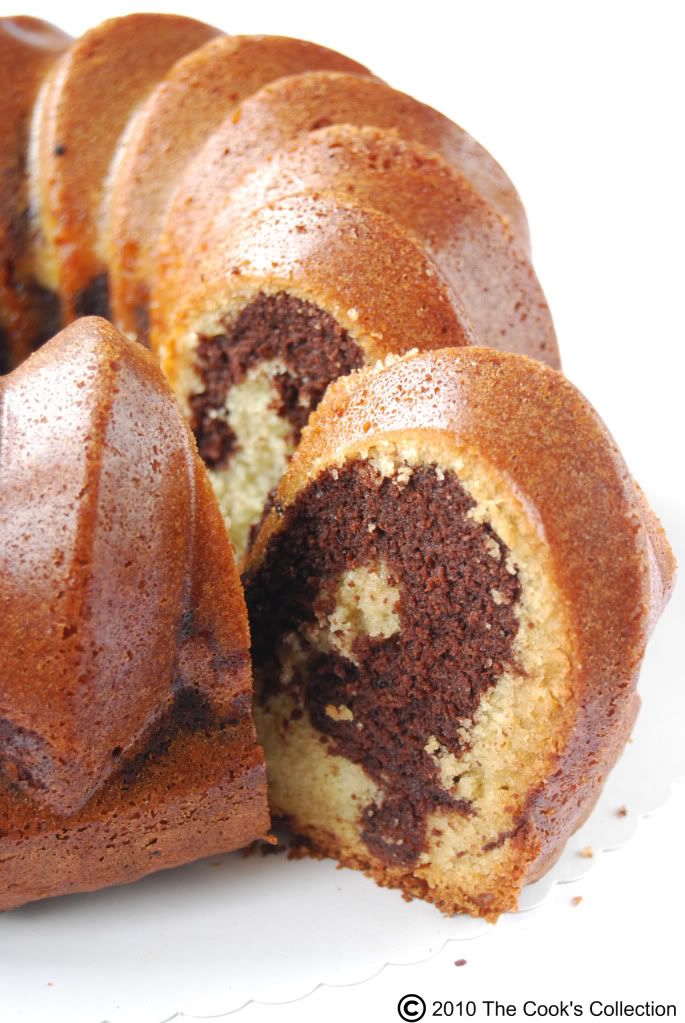
Marble Bundt Cake
The cake - it is cake, so don't kid yourself - should be delight to eat. It is the ultimate coffee accompaniment, when made correctly it is the perfect yin - yang dessert. Unfortunately, many marble cakes lack any distinction between the chocolate and vanilla components; the chocolate flavor is no more interesting than brown food coloring. This recipe is a tribute to the classic marble bundt, with a rich chocolate flavor (thanks to the combination of dark chocolate and cocoa powder) that contrasts nicely with the delicate vanilla swirl. If you're going to eat cake for breakfast, it should be this one.
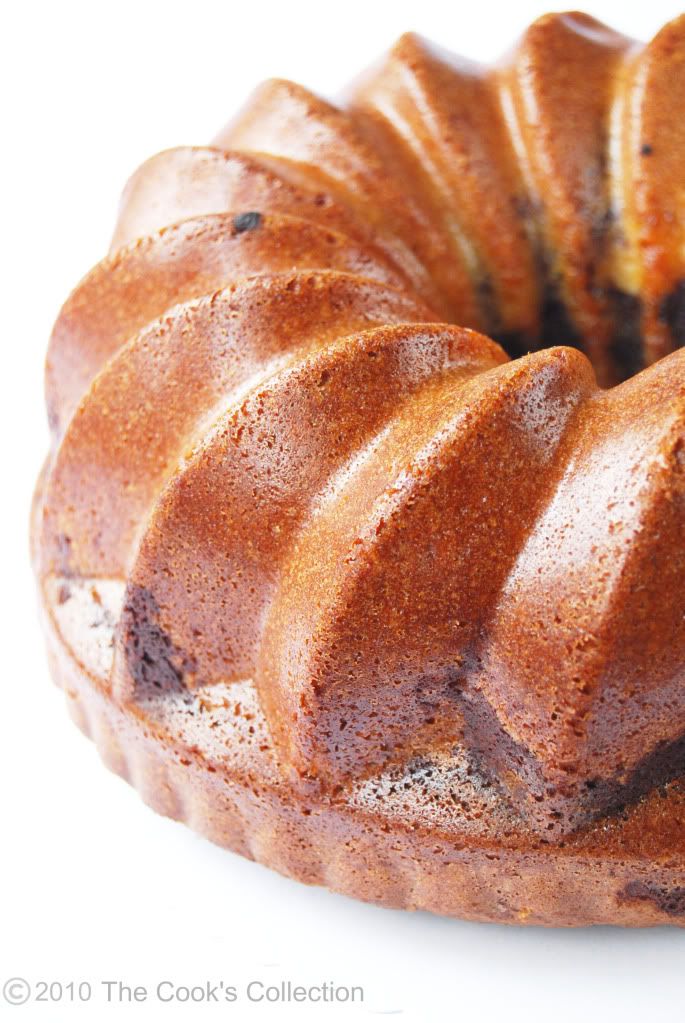
This is the best homemade marble cake i've ever had. I recommend the book "Baked - New Frontiers in Baking" to all my readers who love baking. Go for it!!
Yield : 1 (10 inch) BUNDT CAKE
Adapted from Baked - New Frontiers in Baking
Ingredients:
FOR THE CHOCOLATE SWIRL
6 ounces, 170 grams dark chocolate (60 to 72 % cocoa), coarsely chopped
1 teaspoon unsweetened dark cocoa powder (like Valrhona)
FOR THE SOUR CREAM CAKE
3 1/2 cups all-purpose flour
1 1/2 teaspoons baking powder
1 1/2 teaspoons baking soda
1/2 teaspoon salt
1 cup (2 sticks) unsalted butter, soft but cool, cut into 1-inch pieces
2 1/4 cups sugar
4 large eggs
16 ounces, 453 grams sour cream
1 1/2 teaspoons pure vanilla extract
Directions:
MAKE THE CHOCOLATE SWIRL : In the top of a double boiler over simmering Water, melt the chocolate. When the chocolate is completely smooth, add the cocoa powder and whisk until thoroughly incorporated. Remove the bowl from the heat and set aside.
MAKE THE SOUR CREAM CAKE : Preheat the oven to 350 degrees F. Spray the inside of a 10-inch bundt pan with a nonstick cooking spray or simply use a silicon bundt pan.
Sift the flour, baking powder, baking soda, and slat together into a medium bowl.
In the bowl of an electric mixer fitted with the paddle attachment, cream the butter until smooth and ribbon like. Scrape down the bowl and add the sugar. Beat until the mixture is smooth and fluffy. Add the eggs, one at a time, beating well after each addition. Scrape down the bowl and mix for 30 seconds.
Add the sour cream and vanilla and beat just until incorporated. Add the dry ingredients in three additions, scraping down the bowl before each addition and beating only until each addition is just incorporated. Do not over mix.
Pour one third of the cake batter into the chocolate swirl mixture. Use a spatula to combine the chocolate mixture and the batter to make a smooth chocolate batter. Spread half of the remaining batter in the prepared pan. Use an ice cream scoop to dollop the chocolate cake batter directly on top of the plain cake batter. The dollops will touch and mostly cover the plain batter, but some plain batter will peek through. Use a butter knife to swirl the chocolate and plain cake batter together. Pour the remaining plain batter on top of the chocolate layer and smooth it out. Once again, use the knife to pull through the layers to create a swirl.
Bake in the center of the oven for about 1 hour, rotating the pan halfway through the baking time, or until a sharp knife inserted in the center of the cake comes out clean.
Remove from the oven and let the cake cool in the pan on a wire rack for 30 minutes. Use a knife to loosen the edges of the cake and invert it into the wire rack and let cool. Serve warm or at room temperature.
STORAGE : The cake will keep for 3 days. tightly covered. at room temperature.
Friday, May 28, 2010
Daring Bakers Piece Montée
May 2010 Challenge
The May 2010 Daring Bakers’ challenge was hosted by Cat of Little Miss Cupcake. Cat challenged everyone to make a piece montée, or croquembouche, based on recipes from Peter Kump’s Baking School in Manhattan and Nick Malgieri.
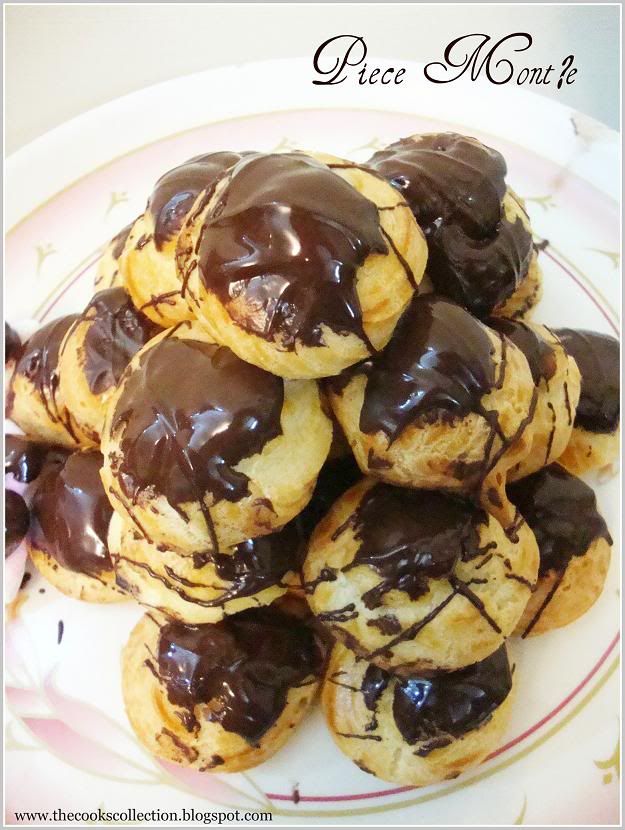
This month’s challenge recipe is for a Piece Montée, which means literally “mounted piece.” You may know this dessert by another name – Croquembouche (“crunch in the mouth”). Piece montée is the traditional wedding cake here in France. They are often served at baptisms and communions as well.
The classic piece montée is a high pyramid/cone made of profiteroles (cream-filled puff pastries) sometimes dipped in chocolate, bound with caramel, and usually decorated with threads of caramel, sugared almonds, chocolate, flowers, or ribbons.
Recipe Source: The recipes used for this month’s challenge comes from Peter Kump’s Baking School in Manhattan and were originally created by famed pastry chef, Nick Malgieri.
Note: This recipe has 3 main components: the pate a choux, the crème patissiere, and the glaze used to mount/decorate it. While you can purchase or make a cardboard conical structure to build your piece montée or use toothpicks as an aid, it is relatively easy to assemble it using just the baked pate a choux as the main building blocks and the glaze as the glue.
While a piece montée may be a bit time-consuming to assemble, the various components are relatively easy to make and don’t require any special ingredients. The best part about them is that once you have mastered them, you will be able to go on and make many beloved French French pastries such as éclairs, profiteroles, Paris-Brest, etc. all of which are made with this pate a choux recipe, a filling and glaze.
Preparation time: You will want to use your puff pastry batter and chocolate glaze or caramel as soon as it has been prepared and as close to serving time as possible. This is not a dessert that stores well and it may be a bit temperamental in humid areas as the glaze needs to harden to hold the choux together. The crème patissiere can be made a couple of days in advance and stored in the fridge until ready to use.
You will need approximately 10 minutes to prepare the puff pastry, 10 minutes to pipe and about 30 minutes to bake each batch. The crème patissiere should take about 10 minutes to cook and then will need to be cooled for at least 6 hours or overnight. The glazes take about 10 minutes to prepare.
Equipment required:
• several baking sheets
• parchment paper
• a whisk
• a pastry brush (for the egg wash)
• a pastry bag and tip (a plain tip or no tip is best for piping the puff pastry; you can use a plain or star tip to fill the puff pastry with the cream)
• a flat surface such as a baking sheet or cake board/stand on which to assemble your piece montée
• some of the items you may want to use to decorate your piece montée include ribbons, Jordan almonds, fresh flowers, sugar cookie cut-outs, chocolates, etc.
Vanilla Crème Patissiere
Ingredients:
For the Vanilla Crème Patissiere (Half Batch)
1 cup (225 ml.) whole milk
2 Tbsp. cornstarch
6 Tbsp. (100 g.) sugar
1 large egg
2 large egg yolks
2 Tbsp. (30 g.) unsalted butter
1 Tsp. Vanilla
Preparation: Dissolve cornstarch in ¼ cup of milk. Combine the remaining milk with the sugar in a saucepan; bring to boil; remove from heat.
Beat the whole egg, then the yolks into the cornstarch mixture. Pour 1/3 of boiling milk into the egg mixture, whisking constantly so that the eggs do not begin to cook.
Return the remaining milk to boil. Pour in the hot egg mixture in a stream, continuing whisking.
Continue whisking (this is important – you do not want the eggs to solidify/cook) until the cream thickens and comes to a boil. Remove from heat and beat in the butter and vanilla.
Pour cream into a stainless steel/ceramic bowl. Press plastic wrap firmly against the surface. Chill immediately and until ready to use.
Pate a Choux (Yield: About 28)
¾ cup (175 ml.) water
6 Tbsp. (85 g.) unsalted butter
¼ Tsp. salt
1 Tbsp. sugar
1 cup (125 g.) all-purpose flour
4 large eggs
For Egg Wash: 1 egg and pinch of salt
Pre-heat oven to 425◦F/220◦C degrees. Line two baking sheets with parchment paper.
Preparing batter:
Combine water, butter, salt and sugar in a saucepan over medium heat. Bring to a boil and stir occasionally. At boil, remove from heat and sift in the flour, stirring to combine completely.
Return to heat and cook, stirring constantly until the batter dries slightly and begins to pull away from the sides of the pan.
Transfer to a bowl and stir with a wooden spoon 1 minute to cool slightly.
Add 1 egg. The batter will appear loose and shiny.
As you stir, the batter will become dry-looking like lightly buttered mashed potatoes.
It is at this point that you will add in the next egg. Repeat until you have incorporated all the eggs.
Piping:
Transfer batter to a pastry bag fitted with a large open tip (I piped directly from the bag opening without a tip). Pipe choux about 1 inch-part in the baking sheets. Choux should be about 1 inch high about 1 inch wide.
Using a clean finger dipped in hot water, gently press down on any tips that have formed on the top of choux when piping. You want them to retain their ball shape, but be smoothly curved on top.
Brush tops with egg wash (1 egg lightly beaten with pinch of salt).
Baking:
Bake the choux at 425◦F/220◦C degrees until well-puffed and turning lightly golden in color, about 10 minutes.
Lower the temperature to 350◦F/180◦C degrees and continue baking until well-colored and dry, about 20 minutes more. Remove to a rack and cool.
Can be stored in a airtight box overnight.
Filling:
When you are ready to assemble your piece montée, using a plain pastry tip, pierce the bottom of each choux. Fill the choux with pastry cream using either the same tip or a star tip, and place on a paper-lined sheet. Choux can be refrigerated briefly at this point while you make your glaze.
Use one of these to top your choux and assemble your piece montée.
Chocolate Glaze:
8 ounces/200 g. finely chopped chocolate (use the finest quality you can afford as the taste will be quite pronounced; I used semi-sweet)
Melt chocolate in microwave or double boiler. Stir at regular intervals to avoid burning. Use the best quality chocolate you can afford. Use immediately.
Assembly of your Piece Montée:
You may want to lay out your unfilled, unglazed choux in a practice design to get a feel for how to assemble the final dessert. For example, if making a conical shape, trace a circle (no bigger than 8 inches) on a piece of parchment to use as a pattern. Then take some of the larger choux and assemble them in the circle for the bottom layer. Practice seeing which pieces fit together best.
Once you are ready to assemble your piece montée, dip the top of each choux in your glaze (careful it may be still hot!), and start assembling on your cake board/plate/sheet. Continue dipping and adding choux in levels using the glaze to hold them together as you build up.
When you have finished the design of your piece montée, you may drizzle with remaining glaze or use ribbons, sugar cookie cut-outs, almonds, flowers, etc. to decorate. Have fun and enjoy! Bon appétit!


