
A quintessential summer vegetable, Zucchini are tender and deliciously mild. Its flavor is so mild it picks up that of whatever you cook it with. It is low in calories and provides a bright green colour, moisture and nutrition to the cooked dish. Zucchini bread along with a glass of cold milk is a great way to start your day. This bread forms a thin soft outer crust and a very soft inner crumb. The presence of walnuts give a crunchy effect with every bite. Its not very sweet. Its a light bread which can be had without any extra accompaniment. This recipe is adapted from the culinary institute of America. Here goes the recipe..

Makes 2 loaves
Ingredients
flour less cooking spray for greasing
3 1/2 cups all-purpose flour plus extra for dusting
2 tsp baking powder
1/2 tsp baking soda
1 tsp salt
1 tsp ground cinnamon
1/2 tsp freshly grated nutmeg
1/4 tsp ground cloves
2 1/2 cups grated unpeeled zucchini
1 cup sugar
4 large eggs, lightly beaten
1/2 cup vegetable oil
2 tbsps grated orange zest
1 cup coarsely chopped toasted walnuts or pecans
Directions
Preheat the oven to 350°F(180°C).
Grease and flour two 8½-inch loaf pans.
Sift the flour, baking powder, baking soda, salt, cinnamon, nutmeg, and cloves into a bowl and set aside.
Combine the zucchini, sugar, eggs, oil, and orange zest in a large bowl and mix by hand until evenly blended.
Add the sifted dry ingredients to the zucchini mixture. Stir by hand just until the batter is evenly moistened and blended.
Fold in the nuts.
Divided the batter between the prepared loaf pans. Bake until the edges are browned and starting to pull away from the pan and the bread springs back when lightly pressed with your fingertip, 50-55 minutes.
Remove the loaves from the pans and let cool on wire racks before serving.
Tuesday, May 26, 2009
Zucchini and walnut bread
Tuesday, May 19, 2009
Paneer Paratha (Flat indian bread stuffed with Indian Cheese)
Paneer also known as cottage cheese is used in a variety of dishes world over. It forms a part of salads, main course dishes and even desserts in the form of cream cheese. Known as the Indian Cheese, paneer is one of the most versatile ingredients available for cooking. Women in India make their own paneer by adding curds to milk thus making it curdle. This paneer can then be grated or crumbled and combined with a blend of subtle masala's making it an ideal stuffing for a paratha. Make these delicious parathas for your family or guests and watch them disappear in a jiffy.
Makes 5 parathas
You'll need the following ingredients..
For the dough
3/4 cup All purpose flour (maida)
3/4 cup Whole wheat flour
2 tsp oil(any)
3/4 tsp Salt
1/2 cup + 1/8 cup Water
To be mixed into a stuffing
1 1/2 cups grated paneer (cottage cheese)
2 tbsp coriander leaves, finely chopped
1 tsp finely chopped green chillies
1 tsp chilli powder
1 tsp dry mango powder (amchur)
Salt to taste
Other ingredients
Whole wheat flour for dusting
Ghee or oil for cooking
Method
For the dough : Combine all the ingredients and knead well into a soft, smooth dough. Divide the dough into 5 equal portions. Keep aside.
How to proceed:
Divide the stuffing into 5 equal portions. Keep aside.
Roll out one portion of the dough into a circle of 3" diameter using whole wheat flour for rolling.
Place one portion of the stuffing in the centre of the circle. Bring together all sides in the center and seal tightly.(refer figure)
Roll out again into a square of 5" using whole wheat flour. Cook on a hot tava(griddle), using a little oil, until both sides are golden brown.
Repeat with the remaining dough and stuffing to make 4 more parathas. Serve hot with any gravy you like. Try with Palak paneer.
Tuesday, May 12, 2009
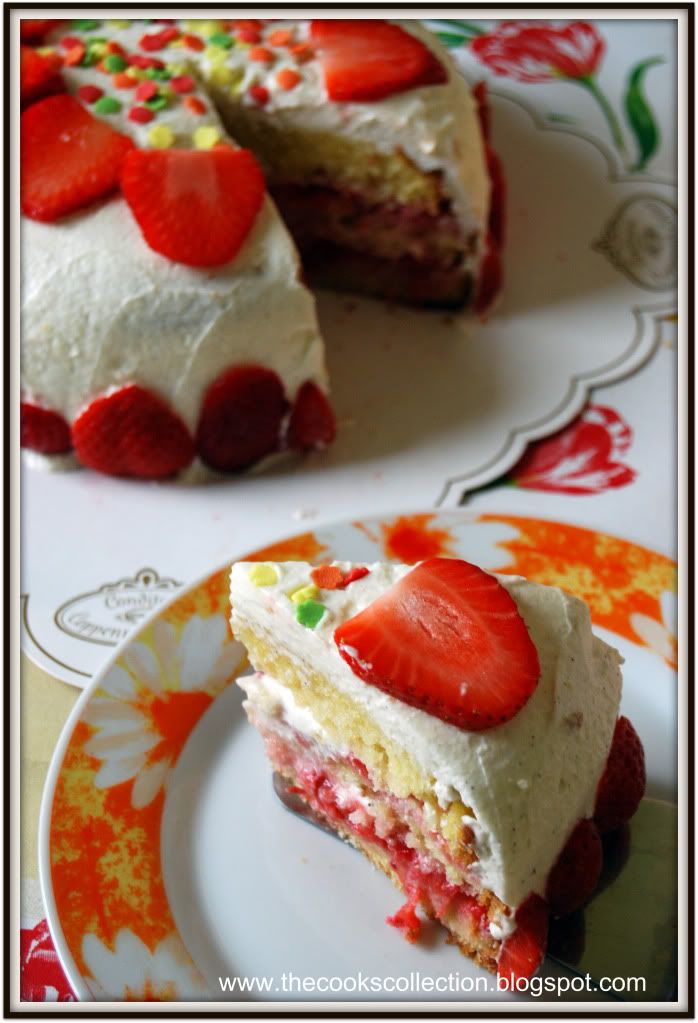
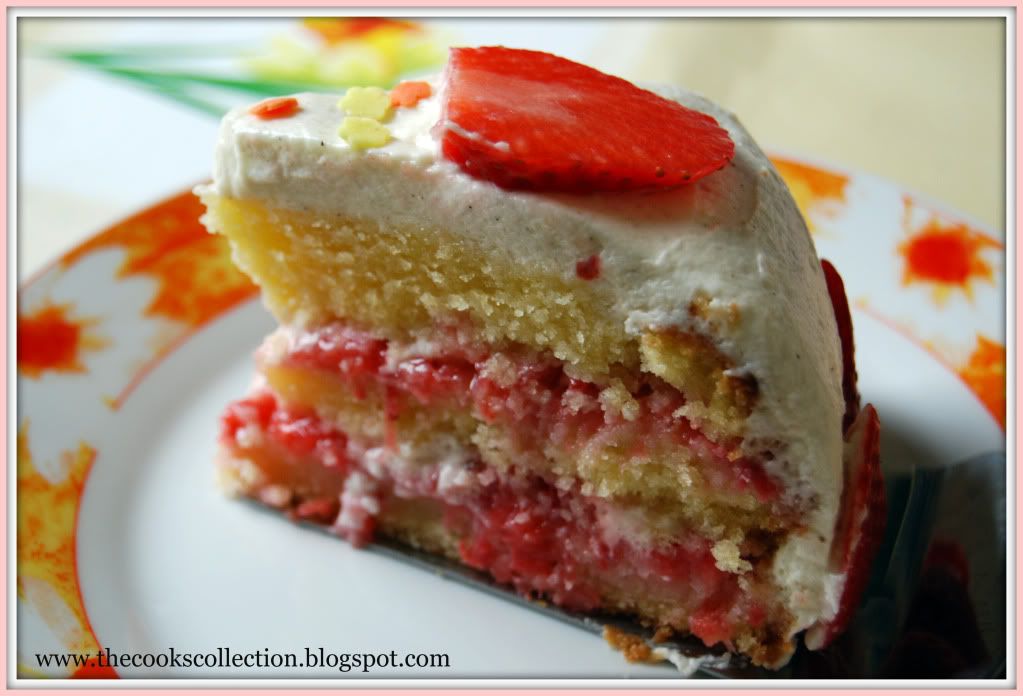
Layered Strawberry Cake
This Strawberry cake is basically a pound cake which is layered with sweet, tangy, juicy and colorful sugared berries and a velvety blend of whipped sweet cream, finished with the same cream and topped with fresh berries. The berry filling and the cream mixture can be used with any Genoise cake or any other plain vanilla cake.
I present this Strawberry cake to Meeta's Monthly Mingle - Spring Cakes!
This recipe is adapted and altered from "Baking With Julia".
The ingredients used for this recipe are:
For the cake
1 1/2 cups all-purpose flour
1 tsp baking powder
1/4 tsp salt
1 stick (4 ounce),115 gms butter, at room temperature
1 cup sugar
2 large eggs, at room temperature, whisked to blend
1/2 cup milk, at room temperature
1 tsp pure vanilla extract
For the Strawberry filling
1 pint (2 cups) ripe fresh strawberries, hulled and sliced
1/4 cup sugar (depending on the sweetness of the fruit)
For the cream
1 1/4 cups cold heavy cream
2 tbsps sour cream
2 tbsps sugar
1 tsp pure vanilla extract
Position a rack in the lower third of the oven and preheat the oven to 350 deg F(180 deg C). Butter and flour a 7 inch round pan.
For the cake Sift the flour, baking powder, and salt together onto a sheet of waxed or parchment paper. Reserve.
Put the butter into the bowl of a mixer fitted with the paddle attachment(or work with a hand-held mixer) and beat at medium speed until smooth. With the machine running, add the sugar in a steady steam. Stop the machine and scrap down the paddle and the sides of the bowl with a rubber spatula. Continue to beat at medium speed until the mixture is very light and fluffy, about 4 to 5 minutes.
With the mixer still at medium speed, begin to add the eggs in small addition, about a tablespoon at a time. If the mixture becomes watery or shiny, stop adding the eggs and beat at an increased speed just until it smooths out. When the batter has come together again, decrease the speed to medium and continue adding the eggs, scraping down the paddle and sides of the bowl from time to time; it will take 3 to 4 minutes to incorporate the eggs. The mixture is properly combined when it appears white, fluffy, and increased in volume.
Reduce the mixer speed to low and add the flour mixture and the milk alternately--4 additions of flour, 3 of milk-- scraping the paddle and bowl frequently and mixing until the batter is smooth after each addition. Add the vanilla and mix just to blend.
Baking the cake Spoon the batter into the prepared pan and smooth the top with a spatula. Bake for 55 to 65 minutes, or until a wooden toothpick inserted in the center of the cake comes out clean. Transfer the cake to a cooling rack and allow it to cool in the pan for 10 minutes. Invert the cake onto a rack, remove the pan, and cool to room temperature.
Preparing the Berries Toss the sliced berries with the sugar in a large bowl and leave them uncovered, at room temperature for at least 2 hours.
Coarsely mash the berries with the tines of the fork and toss them again; let them stand for 1 hour longer. You can do this the day before, but the berries should be refrigerated after they are mashed.
For the cream Using a mixer fitted with the whisk attachment or a hand held mixer, whip the heavy cream, sour cream, sugar and vanilla together until the mixture forms soft peaks. The cream is the proper consistency when the tracks made by the whisk close slowly and almost disappear. Cover and refrigerate the cream, give it a turn or two by hand with a whisk to bring the mixture together again.
Finishing the cake Using a serrated knife and a gentle sawing motion, cut the cake horizontally into 3 layers. Pace the bottom layer cut side up on a cardboard round and the removable bottom of a tart pan. Lifting the berries from the bowl with a slotted spoon so that most of the liquid drains of, spoon half of the mashed strawberries over the cake layer, then spread a thin layer of the whipped cream over the berries. Top with the middle layer, spoon on the rest of the strawberries, and spread another thin layer of the cream over the berries. Center the top layer over the filling.
Working with a flexible metal icing spatula, frost the top and sides of the cake with whipped cream and decorate as you wish with strawberries or with some icing left out. Refrigerate the cake for at least an hour before serving.
Storing The cake can be refrigerated for several hours before serving. Keep it away from the foods in the refrigerator with strong odors, as cream picks up odors quickly. It would be ideal if you could store this cake in a box.
Tuesday, May 5, 2009
Gold Bags
Thai cuisine is an interesting confluence of flavors and cooking styles. The ingredients used in this cuisine delicately balance the harmony of the dish. This recipe is one of the hit starter recipe in Thai cuisine. These are named "gold bags" as they look similar to a bag holding gold coins. Gold bags are dainty pouches filled with spicy vegetables. The ingredients and the flavors used for the filling is perfectly balanced and they match perfectly with the wrapper. These serve as a great starter when accompanied with sweet and sour dip. This dip goes great with this recipe. These gold bags can even be tied with a blade of lemon grass to give an authentic Thai look. Makes 25 to 30 bags
Ingredients:
For the wrappers
1 1/2 cups All purpose flour (maida)
1/2 tsp Salt
For the filling
1 tsp chopped garlic
1 tsp chopped coriander leaves
1/2 tsp whole black peppercorns
1 1/2 cups mashed potatoes, 3 medium sized
2 tbsps carrots, grated
2 tbsps roasted peanuts, ground
1 tbsp soya sauce
1/2 tsp sugar
1/2 tsp salt
Oil for deep frying
Procedure:
For the wrappers
Sieve the flour and salt together. Add the hot water gradually and make a soft dough. Knead for a while. Cover and keep aside for 30 minutes. Apply oil on your palm and knead the dough until it becomes smooth and elastic. Roll out thinly on a floured surface, using a rolling pin. To make these gold bags to look and taste better, roll the wrapper dough as thin as you can. Cut the rolled dough into 25 to 30 squares of 75 mm. (3 ").
For the filling
Pound the garlic, coriander leaves and peppercorns in a mortar to form a paste. In a bowl, mix the paste with mashed potatoes, carrots, peanuts, soya sauce, sugar and salt. Mix thoroughly. 
 How to proceed:
Place a spring roll sheet on a dry surface. Spoon a little of the filling mixture in the centre of the wrapper square and gather all 4 corners in the centre to form a pouch. Fluff out gathers to make it look like a money bag.
 Deep fry in hot oil till golden brown. Drain and tie with a blade of lemon grass. This gives a very distinctive look.
 Serve hot with the sweet and sour dip.

Sweet and Sour Dip
Combine this sweet and tangy dip with any deep-fried starter. It'll add a wonderful taste.
Makes: 1 1/2 cups
Ingredients:
100ml. fresh tamarind pulp
200 gms jaggery, crumbled
2 tsp red chilli powder or red chilli flakes
2 tbsps honey
1/2 cup water
1 tsp salt
Method:
Combine all the ingredients except honey in a pan and simmer till the sauce reduces to half.
Cool and add honey and salt. Mix well
Monday, April 27, 2009
Daring Bakers - Cheesecake
Daring Bakers April 2009 - Cheesecake Centerpiece


The recipe would fit for a 9" springform pan but i had a 7" pan. So i used the recipe for one 7" pan and used up the extra with a muffin pan, where i got another 6 muffin shaped cheese cakes.
2 Cups fruits, Chopped ( Strawberry, raspberry, blueberry, banana, grapes)


Tuesday, April 21, 2009
Paneer Kheer (Indian Cottage Cheese Pudding)
A simple yet an elegent dessert. When one thinks of Kheer one automatically relates it to rice kheer or semolina kheer. Here is a brilliant innovation, the "paneer kheer". As the name suggests this kheer is made with grated paneer that is cooked in milk along with some sugar and flavoured with cardamom powder. The dry fruits provides the crunch and enhances the taste also adding to the richness of the dessert. Corn flour has been added to help thicken the milk faster so as to reduce cooking time. Since dairy products are plentiful in North India, this dessert is an apt end to North Indian meal. This dessert is a great made ahead option to opt for.. Preparation time:5 minutes
Cooking time: 15 minutes
Serves:4
Ingredients required:
3 Cups milk
2 tbsp cornflour dissolved in 5 tbsp water
1/2 cup sugar
1 1/4 cups grated paneer (cottage cheese)
2 tbsp chopped pistachios
2 tbsp chopped almonds
1/2 tsp cardamom powder
To decorate:
4 tbsp Sweetened Condensed milk
Few roasted and chopped nuts on top
Combine milk and sugar in a broad non-stick pan. Simmer on a medium flame, while stirring continously, till the sugar dissolves completely.
Add the cornflour mixture and stir continously till the mixture thickens.
Add the paneer, pistachios, almonds and cardamom powder and mix well. Thats it!
Refrigerate for atleast an hour.
Serve Chilled with a spoon of condensed milk on top and decorate with roasted and chopped nuts.

Enjoy!!
Tuesday, April 14, 2009
Sweet Ricotta Pie
This dessert uses pasta frolla, a sweet Italian pie dough for the base and lattice. The filling used here in this recipe can be made in minutes. It uses just 5 ingredients and Anisette, a licorice-flavoured liqueur, is the traditional flavouring for this type of cheese cake, but you can use anise extract or alter the flavour completely by substituting vanilla or almond extract, using brandy, or mixing in a little fruit-flavoured liqueur, such as Grand Marnier. I made a mini version of this recipe as i had to serve just 2 people. I reduced the recipe into half (reduced all the ingredients for filling by half and used just 1 large egg) and used 4 mini tart molds instead of a large one. I loved this dessert as it has a light cheese filling and a crisp cookie feel base. I freezed half the recipe of pasta frolla and will be using it for other recipes.
Recipe adapted from "Baking With Julia"
Ingredients required;
1 pound, OR 450 gms whole milk ricotta
1/3 cup sugar, ( i added a little extra for the sweetness)
1 tbsp anisette or 1 tbsp vanilla extract
3 large eggs, beaten
1/2 tsp cinnamon
1 recipe Pasta Frolla
Method;
Stir in ricotta, sugar, anisette, and eggs together in a bowl until smooth; set aside.
Position a rack in the lower third of the oven and preheat the oven to 350 deg F. Butter a 9-inch glass pie plate. (If you dont have a glass pie plate, use metal, but increase the oven temperature to 375 deg F.) (I used mini tart molds)
Working with 2/3 rd of the dough, knead it into a disc and roll it on a lightly floured work surface into a 12 inch circle. Transfer the dough to the pie plate and press it gently against the bottom and up the sides of the plate. Dont worry if the dough tears-just press it back together. Use the dull side of the knife to trim the excess dough even with the rim. Srape the filling into the pie shell, smooth the top, and dust with cinnamon.
Forming the lattice
Knead and shape the remaining piece of dough into a block and roll it on a lightly floured surface into a 9-inch square. Using a pizza or pastry cutter ( a ruffle-edged pastry wheel is nice) or a thin sharp knife, cut the dough into 12 even strips. To form the lattice top, lay 6 of the strips across the pie at 1 1/4 inch intervals, then crisscross with the remaining strips, placing them diagonally across the first strips. Trim the ends of the lattice even with the edge of the pan.
Baking the Pie
Bake for 35 to 40 minutes, or until the crust is golden and the filling is firm and slightly puffed. Transfer the pie to a rack and cool completely before serving. Storing ;
Leftovers can be kept, well covered in the refrigerator, for up to 3 days. Serve slightly chilled or at room temperature.
Pasta Frolla
Pasta frolla - pasta means "paste" or "dough" amd frolla means "tender" - is a sweet Italian pie dough. It is indeed tender, light and crumbly too, and a crust as commendable with savory fillings as with sweet such as Sweet Ricotta Pie. Its a made-in-the-food-processor dough thats's almost indestructable. And because of relatively large amount of sugar, you dont have to worry about overworking it, nor do you need to be concerned if it cracks as it goes into the pie plate - everything is fixable. Makes enough for a 9-inch lattice -topped pie
You'll need the following Ingredients...
2 cups all-purpose flour
1/3 cup sugar
1/2 tsp baking powder
1/4 tsp salt
1 stick (4 ounces) cold unsalted butter or 4 ounces cold lard, cut into 8 pieces
2 large eggs, lightly beaten
Method
Put the flour, sugar, baking powder, and salt into the work bowl of a food processor fitted with metal blade; pulse a few time just to mix the ingredients. Add the butter and pulse 15 to 20 minutes, or until the mixture resembles fine cornmeal. With the machine running, add the eggs and process until the dough forms a ball on the blade, about a minute or so. Remove the dough from the food processor and knead it, folding it over on itself, until it is smooth, 1 to 2 minutes. Wrap the dough in plastic and set aside for up to 30 minutes, or chill until needed.
Storing
The dough can be made up to 3 days ahead, wrapped well, and refrigerated, or frozen, tightly wrapped, for up to a month. Thaw , still wrapped, in the refrigerator.
Try this recipe with Sweet Ricotta Pie.
Tuesday, April 7, 2009
Goanese Potato Curry
This delicious curry tastes great with parathas or preferably with steamed rice or pulao. Here is a lovely blend of spices and coconut which gives the curry an authentic taste. 
Recipe adapted from Tarla Dalal's Curries and Kadhis
Ingredients
4 cups big chunks of potatoes
1 large tomato
2 tbsp oil (sunflower or vegetable)
1 tsp mustard seeds
Salt to taste
For the paste
2 whole onions
2 tsp poppy seeds (khus-khus)
2 sticks cinnamon (dalchini)
2 cloves (laung)
2 peppercorns
2 tsp coriander (dhania) seeds
3 whole dry red chillies, broken into pieces
3/4 cup freshly grated coconut or 1/2 cup dessicated coconut powder
5 cloves garlic
3 tsp oil
For the paste
Put 1 tsp of oil in a frying pan and fry the poppy seeds, cinnamon, cloves, peppercorns, corriander seeds and red chillies for a few minutes. Keep aside.
Fry the onions in a tsp of oil till they are soft and keep aside.
Put 2 tsp of oil in a frying pan and fry the coconut for 1 minute.
Mix all the above three ingredients along with garlic and blend to a smooth paste in the blender by adding a little water if required.
How to Proceed
Cut the tomatoes into big pieces, add two cups of water and cook. When soft, prepare a soup by passing through a sieve. Keep aside.
Heat the oil in a kadai, add mustard seeds. When the mustard seeds stop crackling add the potatoes, salt and a cup of water. Cover with a lid and cook till the potatoes are done.
Add the paste, tomato soup and salt (if required) and bring to a boil.
Serve hot. Its yumm!!


